Contents
- Before you start
- Installation
- Identifying your photos
- Understanding the results
- Settings
- Using the cloud AI (optional)
- Tips for best results
- Updating and uninstalling
- Troubleshooting
- Licence and credits
1. Before you start
You need:
| Lightroom | Adobe Lightroom Classic (version 6 or later). The cloud-based "Lightroom" app (without "Classic") does not support plugins like this. |
|---|---|
| Computer | Windows 10/11 or macOS. At least 8 GB of memory; 16 GB or more is recommended. |
| Python | Python 3.12 (3.10–3.13 also work). It is free and is used by the AI helper. See section 2. |
| Disk space | About 6–8 GB for the AI libraries and model (more with NVIDIA GPU support). |
| Internet | Needed for installation, and once per area to download its local species list. After that, the free AI works offline. |
| Graphics card | Optional but much faster: an NVIDIA card on Windows, or any Apple Silicon Mac (M1 or later). |
2. Installation
Download the latest release (a .zip file) from www.distinctlyaverage.co.uk and unzip it, for example to your Downloads folder. It contains a WildlifeTagger.lrplugin folder, an install folder and a PDF copy of this guide.
Windows
- Install Python 3.12 from python.org/downloads/windows. In the installer, tick "Add python.exe to PATH" and leave the "py launcher" option ticked.
- Close Lightroom Classic.
- Open the unzipped folder, go into install and double-click install_windows.bat. If Windows SmartScreen warns you, click More info and then Run anyway.
- Wait while it installs. The first time this downloads several GB, so it can take 10–30 minutes. If you have an NVIDIA graphics card, it also installs GPU support (about 3 GB more).
- When it says Done, press a key to close the window and start Lightroom Classic.
macOS
- Install Python 3.12 from python.org/downloads/macos. Use the official installer; the Python that comes with Apple's developer tools is too old.
- Quit Lightroom Classic.
- Open the unzipped folder, go into install and double-click install_mac.command. If macOS says it cannot be opened, right-click (or Control-click) the file, choose Open, then Open again.
- Wait while it installs and downloads the AI model (several GB, 10–30 minutes the first time).
- When it says Done, close the Terminal window and start Lightroom Classic.
Check that it works
- In Lightroom, choose File > Plug-in Manager.
- Select Wildlife Tagger in the list on the left. It should say Installed and running.
- Scroll to Scope and Helper and click Test AI Helper. After a short wait you should see the version, where the AI runs (GPU, Apple GPU or cpu) and how long a test photo took.
3. Identifying your photos
- In the Library module, click a folder in the Folders panel on the left. Only the photos in this folder are analysed; subfolders are optional (see section 5). Collections are not used: it must be a folder.
- Choose Library > Plug-in Extras > Identify Wildlife in Current Folder. The same command is also under File > Plug-in Extras.
- A message shows how many photos will be analysed, which AI engine is used and whether star ratings will be set. Click Start.
- A progress bar appears at the top left of the Lightroom window. The first run in a new area first downloads that area's species list (up to a few minutes). You can keep working, or click the X next to the progress bar to cancel; photos already done keep their results.
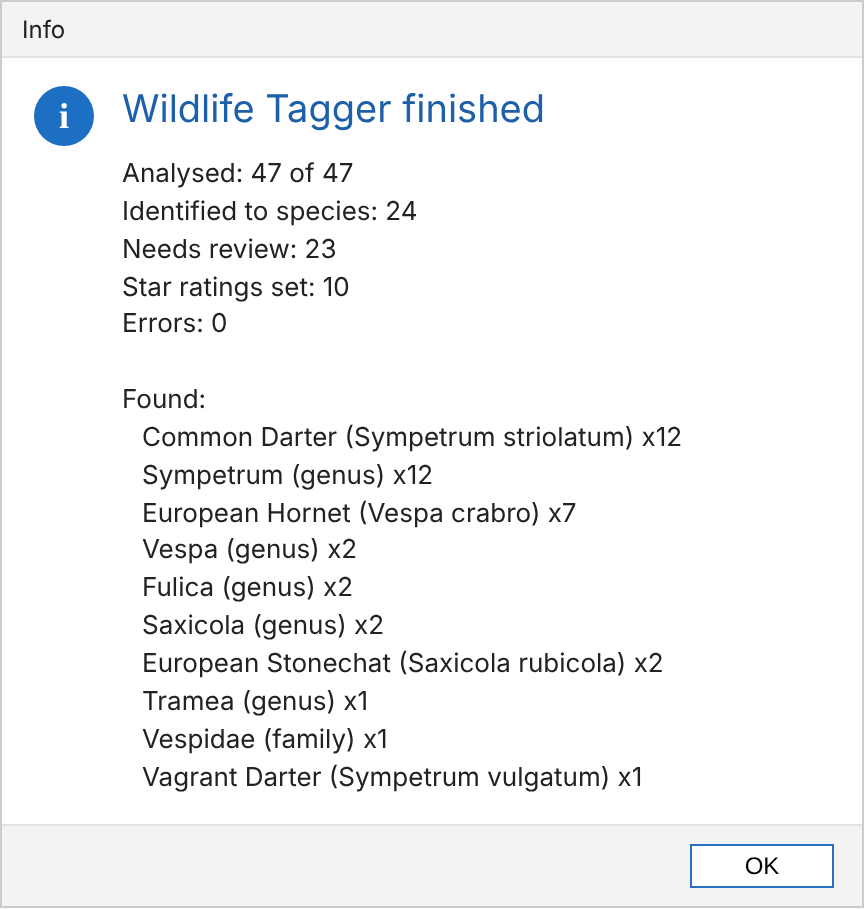
- When it has finished, a summary shows how many photos were identified, which species were found and any problems.

How long it takes
| Setup | Typical time per photo |
|---|---|
| NVIDIA GPU (Windows) | Well under 1 second |
| Apple Silicon Mac | About 0.5–1 second |
| Processor only (no supported GPU) | About 1–3 seconds |
| Cloud AI | About 3–10 seconds, depending on your connection |
Lightroom first has to create a preview of each photo, so very large raw files add a little time. By default, photos that have already been analysed are skipped, so running it again on a folder only processes new photos.
4. Understanding the results
Keywords
Each identified photo gets a keyword nested under class, order and family, for example:
Wildlife › Aves › Accipitriformes › Accipitridae › Red Kite
The scientific name (Milvus milvus) is added as a synonym, so it is found by searches and included when you export. The common name is in your language, using the local name where it differs (for example British versus American English).
When the AI isn't sure
The plugin only names a species when it is confident enough (55% by default). Otherwise it steps back to a level it is sure of:
| Result | Keyword example | Meaning |
|---|---|---|
| Species | … › Accipitridae › Red Kite | Confident identification |
| Genus | … › Accipitridae › Milvus sp. | A kite, but which one is uncertain |
| Family / order / class | … › Accipitriformes › Accipitridae | Only the wider group is certain |
| Not identified | (no species keyword) | No recognisable subject, or too uncertain |
Anything below species level also gets the keyword Wildlife › Needs review, so you can find those photos quickly in the Keyword List and check them yourself.
Wildlife Tagger fields in the Metadata panel
In the Metadata panel on the right of the Library module, choose Wildlife Tagger from the drop-down menu at the top of the panel to see:
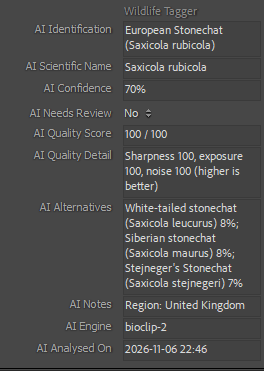
| Field | Contents |
|---|---|
| AI Identification | Common and scientific name, or the rank reached (e.g. Milvus (genus)) |
| AI Scientific Name | The scientific name on its own |
| AI Confidence | How sure the AI was, as a percentage |
| AI Needs Review | Yes / No |
| AI Alternatives | The next most likely species, and the best guess when only a genus or family was tagged |
| AI Notes | Region used, any warnings and, with the cloud AI, sex/age and behaviour |
| AI Quality Score | 0–100, plus sharpness, exposure and noise details |
| AI Engine, AI Analysed On | Which AI was used, and when |
Star ratings
If you turn on star ratings (section 5), each photo gets 1 to 5 stars from its quality score. The score is mostly about how sharp the subject is: the sharpest part of the frame is taken as the subject, so a crisp bird against a soft background scores well. Exposure and noise count for less. Ratings you have already set are not changed unless you allow it.
| Rating mode | How it works | Best for |
|---|---|---|
| Absolute | The same scale everywhere: 85+ = 5 stars, 68+ = 4, 50+ = 3, 30+ = 2, below that = 1. You can change these thresholds. | Comparing photos across folders |
| Best of the folder | Photos are ranked against each other: the top 10% get 5 stars, the next 20% get 4, and so on. A photo never gets more than one star above its absolute score, so a folder of blurry shots doesn't get 5 stars. | Culling bursts and picking the sharpest frames |
5. Settings
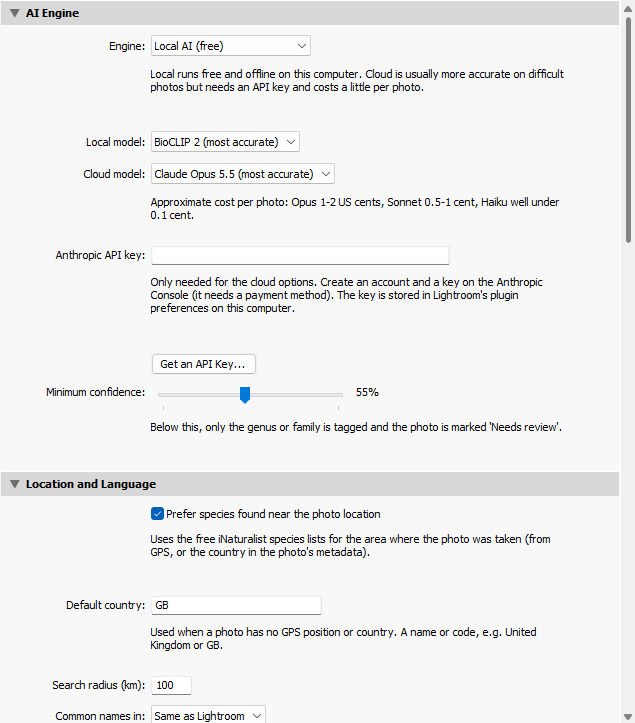
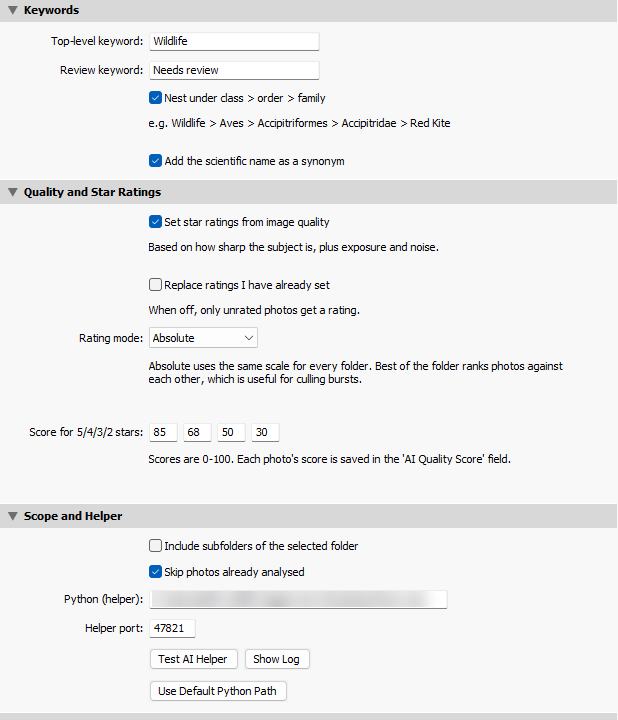
All settings are in File > Plug-in Manager > Wildlife Tagger. Changes take effect the next time you run it.
| Setting | Default | What it does |
|---|---|---|
| Engine | Local AI | Local AI (free): runs on your computer, offline. Local AI, cloud when unsure: only uncertain photos go to the cloud, which keeps costs low. Cloud AI: every photo goes to the cloud. |
| Local model | BioCLIP 2 | BioCLIP 2 is more accurate; BioCLIP is smaller and faster on older computers. |
| Cloud model | Claude Opus 5.5 | Opus is the most accurate (about 1–2 US cents per photo); Sonnet is balanced; Haiku is cheapest. |
| Anthropic API key | (empty) | Only for the cloud options; see section 6. |
| Minimum confidence | 55% | Below this, only the genus or family is tagged and the photo is marked Needs review. Raise it for fewer but surer species tags; lower it for more species tags with more mistakes. |
| Prefer species found near the photo location | On | Uses iNaturalist's free records to favour species found in the area. |
| Default country | (empty) | Used when a photo has no GPS or country. A name or code: United Kingdom, GB, France, US… |
| Search radius (km) | 100 | How far around a GPS position to look for recorded species. |
| Common names in | Same as Lightroom | Language for the keyword names. |
| Top-level keyword | Wildlife | The parent keyword everything is placed under. |
| Review keyword | Needs review | Added to uncertain photos. Leave it empty to turn it off. |
| Nest under class › order › family | On | Off gives a flat list: Wildlife › Red Kite. |
| Add the scientific name as a synonym | On | |
| Set star ratings from image quality | Off | Turns star ratings on. |
| Replace ratings I have already set | Off | When off, only unrated photos get a rating. |
| Rating mode / score thresholds | Absolute; 85/68/50/30 | See section 4. |
| Include subfolders | Off | Also analyse the folders inside the selected folder. |
| Skip photos already analysed | On | Turn off to analyse a folder again, for example after changing settings. Old Wildlife Tagger keywords are replaced, not duplicated. |
| Python (helper), Helper port | (automatic) | Normally left alone. Use Default Python Path resets the Python location. |
6. Using the cloud AI (optional)
The cloud option uses Anthropic's Claude AI. It is usually better on difficult photos, such as females and juveniles, similar-looking species, and small or partly hidden subjects. It also notes sex/age and behaviour where visible. It needs an account and is paid per photo.
- In the plugin settings, click Get an API Key..., or go to console.anthropic.com/settings/keys.
- Create an account, add a payment method and buy some credit. A few pounds or dollars is enough for hundreds of photos with Opus, or thousands with Haiku.
- Click Create Key, give it a name such as Lightroom, and copy the key (it starts with sk-ant-).
- Paste it into Anthropic API key in the plugin settings.
- Set Engine to Local AI, cloud when unsure (recommended) or Cloud AI.
Privacy
- Local AI: your photos never leave your computer. The only thing sent over the internet is a request for the species list of an area, using a location rounded to roughly 50 km.
- Cloud AI: a reduced copy of each photo (1600 pixels on the long side, with your edits) is sent to Anthropic, together with its location and date.
7. Tips for best results
- Crop first. The plugin analyses the photo as you have edited it, so a tight crop on a distant subject helps the AI a lot.
- Add a location. GPS data, a country in the metadata or a default country all clearly improve identification.
- Check the "Needs review" photos. The AI Alternatives field often contains the right answer.
- Use "Best of the folder" for bursts. It quickly shows which frames are sharpest.
- Fix mistakes normally. Edit the keywords as usual; the plugin won't change them again unless you re-analyse with "Skip photos already analysed" turned off.
Limitations
- The AI is very good on clear photos of common birds and mammals, but less reliable on small insects, juveniles and look-alike species. Always treat its answers as suggestions.
- Only the main subject is identified. With several species in one photo, normally only the most prominent one is tagged.
- The quality score measures technical sharpness, not composition. A sharp twig in front of a soft bird can be mistaken for the subject.
- The free AI's common names are looked up online once and then remembered; while offline, English names may be used.
8. Updating and uninstalling
Updating
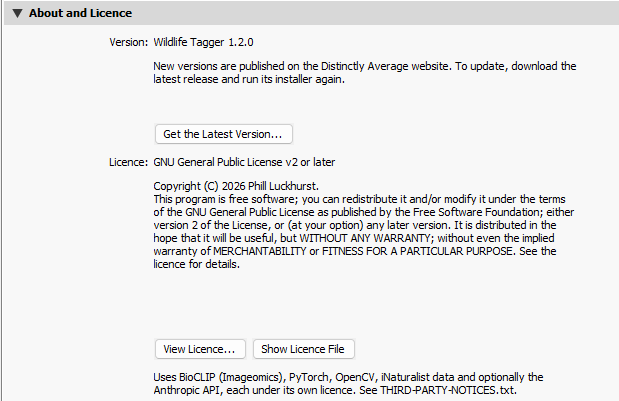
The installed version is shown in About and Licence at the bottom of the plugin settings. Click Get the Latest Version... to open www.distinctlyaverage.co.uk.
- Download and unzip the new release.
- Close Lightroom Classic.
- Run the installer again (install_windows.bat or install_mac.command). It is much quicker the second time, and your settings and the downloaded AI model are kept.
Uninstalling
- In File > Plug-in Manager, select Wildlife Tagger and click Remove, or delete the plugin folder:
Windows:%APPDATA%\Adobe\Lightroom\Modules\WildlifeTagger.lrplugin
Mac:~/Library/Application Support/Adobe/Lightroom/Modules/WildlifeTagger.lrplugin - Delete the helper folder
.wildlife-taggerin your user folder (C:\Users\<you>or your Mac home folder). - To free the space used by the AI model, also delete
.cache\huggingfacein your user folder (only if no other software uses it).
Your keywords and star ratings stay in your catalog after uninstalling.
9. Troubleshooting
Start with Test AI Helper in the plugin settings: it shows most problems straight away. Use Show Log to open the log file, which records every step and how long it took.
| Problem | What to do |
|---|---|
| "Python for the AI helper was not found" | Run the installer again. If Python is installed somewhere unusual, click Use Default Python Path after installing. |
| "No folder selected" | Click a folder in the Folders panel. Collections, "All Photographs" and "Previous Import" are not used. |
| Very slow, and Test AI Helper says Runs on: cpu on a PC with an NVIDIA card | Close Lightroom, update the NVIDIA driver and run the installer again. It installs GPU support automatically. |
| "The AI helper stopped responding" | Click Test AI Helper. If that fails, use Library > Plug-in Extras > Stop AI Helper, restart Lightroom and try again. If it still fails, send the log file (see below). |
| "Regional species list not available" | iNaturalist could not be reached or was slow. Photos are still identified, just without the location boost. It retries next time. |
| Names are in English instead of my language | The name lookup needs the internet the first time. Some species have no common name in every language. |
| Photos are not re-analysed | Turn off Skip photos already analysed. |
| "Cloud AI failed" | Check the API key, and that your Anthropic account has credit. |
| The plugin shows "Installed but not working" | Remove it in the Plug-in Manager and run the installer again. |
Log file locations
Windows: C:\Users\<you>\.wildlife-tagger\helper.log
Mac: ~/.wildlife-tagger/helper.log (in Finder, press Cmd+Shift+. to show hidden folders)
When asking for help, please include the log file and what Test AI Helper shows. Help and updates: www.distinctlyaverage.co.uk.
10. Licence and credits
Wildlife Tagger is Copyright © 2026 Phill Luckhurst.
This program is free software: you can redistribute it and/or modify it under the terms of the GNU General Public License as published by the Free Software Foundation, either version 2 of the License, or (at your option) any later version. It is distributed in the hope that it will be useful, but WITHOUT ANY WARRANTY; without even the implied warranty of MERCHANTABILITY or FITNESS FOR A PARTICULAR PURPOSE. The full licence is in LICENSE.txt in the download, and also at gnu.org/licenses/old-licenses/gpl-2.0.html.
The plugin uses the following components, each under its own licence (see THIRD-PARTY-NOTICES.txt in the download):
- BioCLIP / BioCLIP 2 by the Imageomics Institute: the free species-identification models.
- iNaturalist: regional species records and common names, contributed by its community of naturalists.
- PyTorch, OpenCV, NumPy and Pillow: AI and image processing.
- Claude by Anthropic: optional cloud identification, using your own API key.
Adobe, Lightroom and Lightroom Classic are trademarks of Adobe Inc. Wildlife Tagger is an independent project, not affiliated with or endorsed by Adobe, iNaturalist, the Imageomics Institute or Anthropic.


