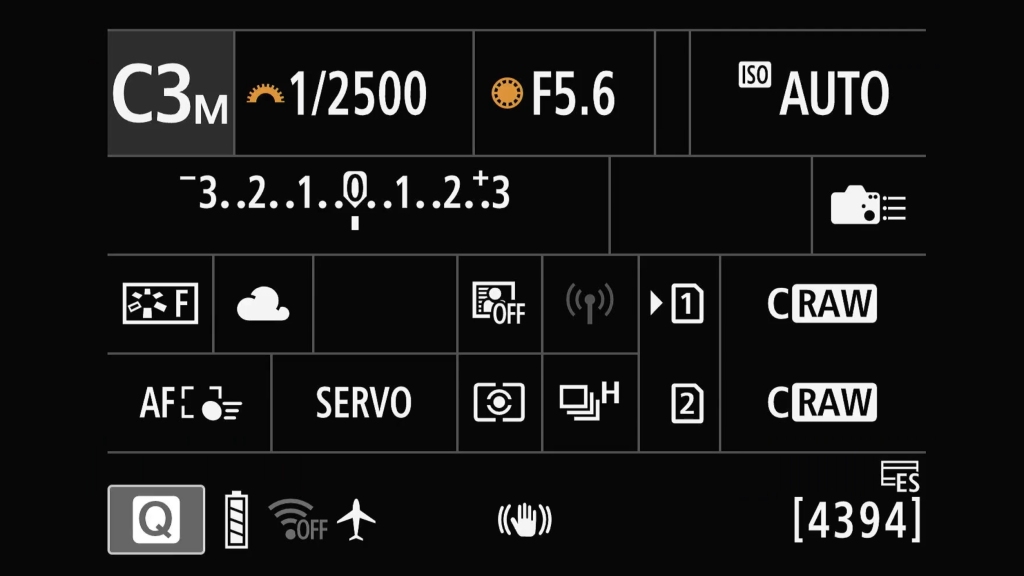
Sat in a public hide at my local reservoir recently and the wildlife was just not playing ball. As the time oozed by the gathered togs begun chatting about their setups. Three of us had the Canon R7 that day and there seemed a lot of interest in why I had managed to get on a peregrine so quickly while they were struggling a little with their AF. A lot of gassing and general light hearted jesting ensued but it was all quite constructive. What eventually got asked was if I could go through my setup. With the sheer amount of settings there is on modern cameras, and I was aware it was getting dark in 4 hours, I agreed to put my current setup online. So what follows may not be the most gripping read, especially as there is a lot to cover. I will only detail my current wildlife settings here, presently programmed on C3 as that is where I am used to them being on my DLSRs. I hope anyone who reads this will either ask questions or comment on my setting as I have lots to learn. I am more than happy to try any suggestions and hope even the smallest thing will improve my fun with this wonderful camera.
I like to keep things relatively simple, mainly because my ageing mind cannot cope with changing setup and what my subjects are doing at the same time. I have to concentrate on the wildlife so hard I usually miss much of the information displayed in the viewfinder. So sticking with the defaults of many years with the top dial taking care of shutter speed, the rear dial the aperture and letting Auto ISO deal with my exposure has been working well for me for may years now.
There are conditions where it AUTO ISO makes a total pigs ear of thing though, strong backlight or white subjects in bright sunshine springs to mind. Sometimes I can dial in some compensation, but others I have to set everything to full manual. On my old DSLRs, experience told me when to change, that or chimping and seeing how much I had screwed up. With an EVF and exposure simulation things are so much easier. I can instantly see how far off things are and correct if need be.
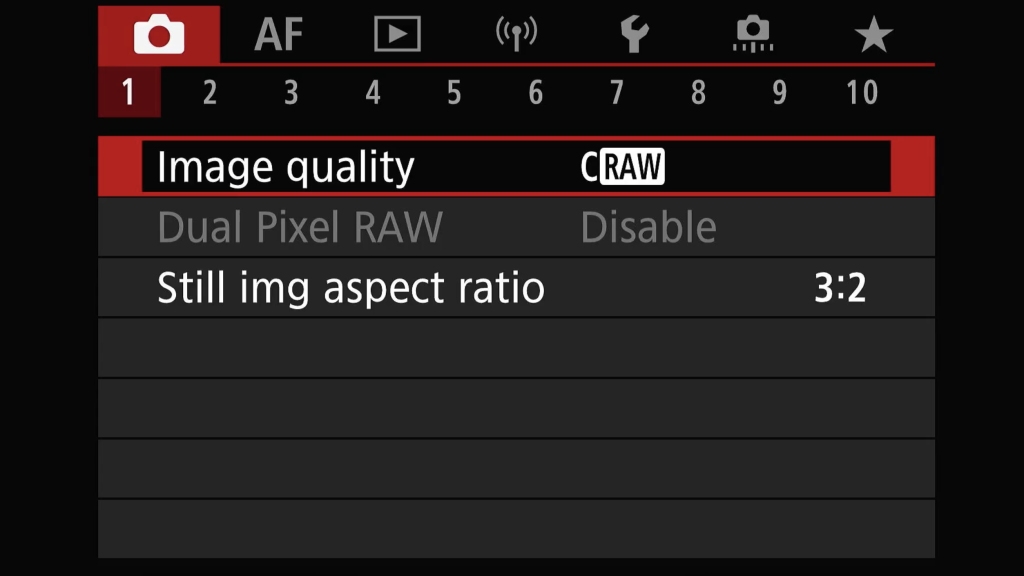
The red menu on Canon cameras houses many of the basic settings. For general wildlife only a few things I change here. On page one the only setting I change is how I want my image recorded. In the past I always shot RAW. It gave me the best chance of adjusting my shots to how I wanted them to look. If, as is frequently the case, I get things wrong, RAW gave me the greatest latitude for slapping the sliders to their full extent. In recent times Canon introduced CRAW, a lossy compressed RAW format which makes files much smaller. That lets me fit substantially more images on my memory cards and hard drive with the added bonus that it allows more shuts in the relatively small buffer that the R7 sports. At first the word "lossy" worried me but in all honesty even the most pedantic of pixel peeper would struggle to tell the difference between RAW and CRAW output.
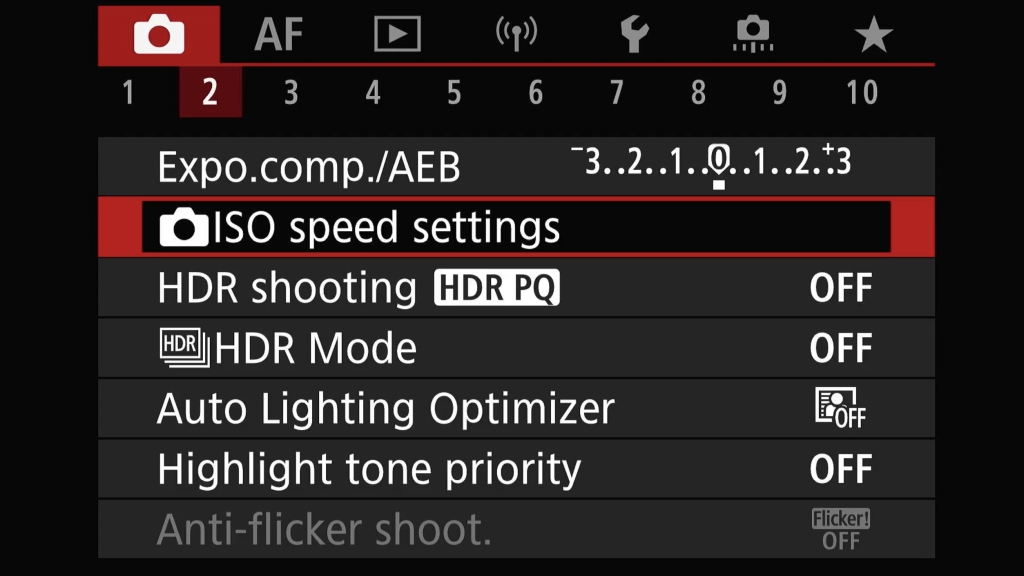
For red 2 there is nothing I change for wildlife here, although I do change exposure compensation while shooting on occasion as I mentioned earlier. I do this through a custom button rather than this menu.
Red 3 is another page where I change nothing. For general wildlife I don't use flash, something I only use for macro.
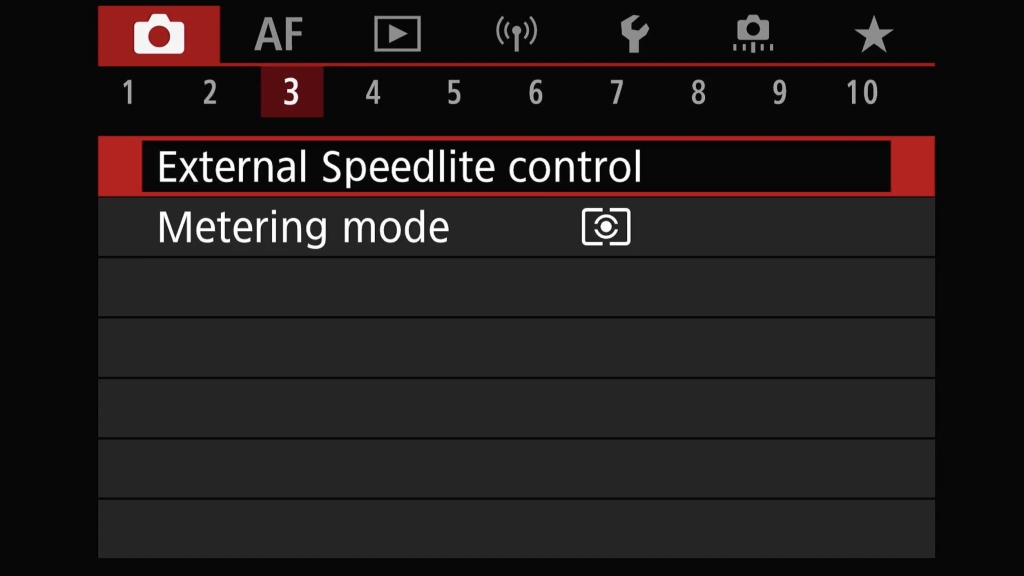
Here I could set my metering mode but again, I do that through the quick settings Q button if I need to. I usually just use evaluative metering but will change to spot metering for white birds in bright sunlight.
Red 4 has the white balance control. Here it is set to cloudy which is the norm for us in the UK. It is probably my most used white balance setting, another I change from the Q screen. As I am shooting in CRAW that is not set in stone in the file so I can change this in post anyway. I do try and set this correctly for the conditions as it makes the viewfinder look more true the scene when I am using exposure simulation. The same goes for the picture style, also set on this page.

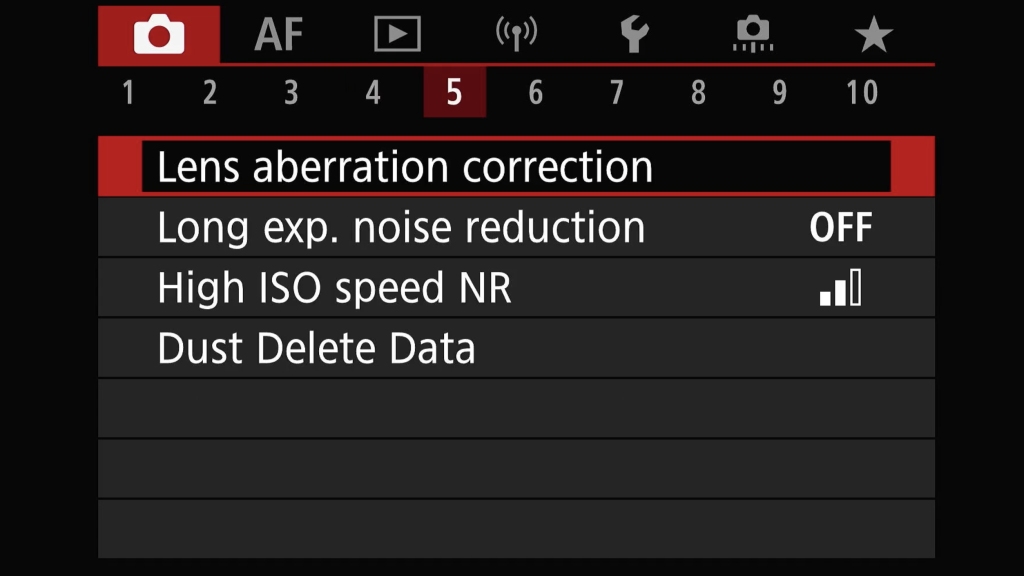
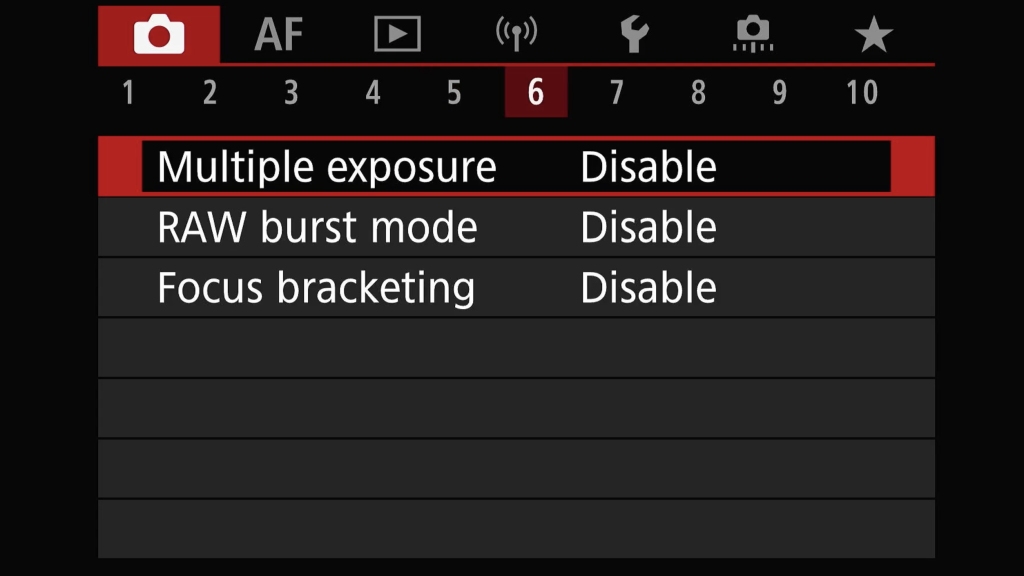
Red 5&6 I don't change anything on these pages. I do use RAW burst mode but I enable/disable that with a custom control setting.
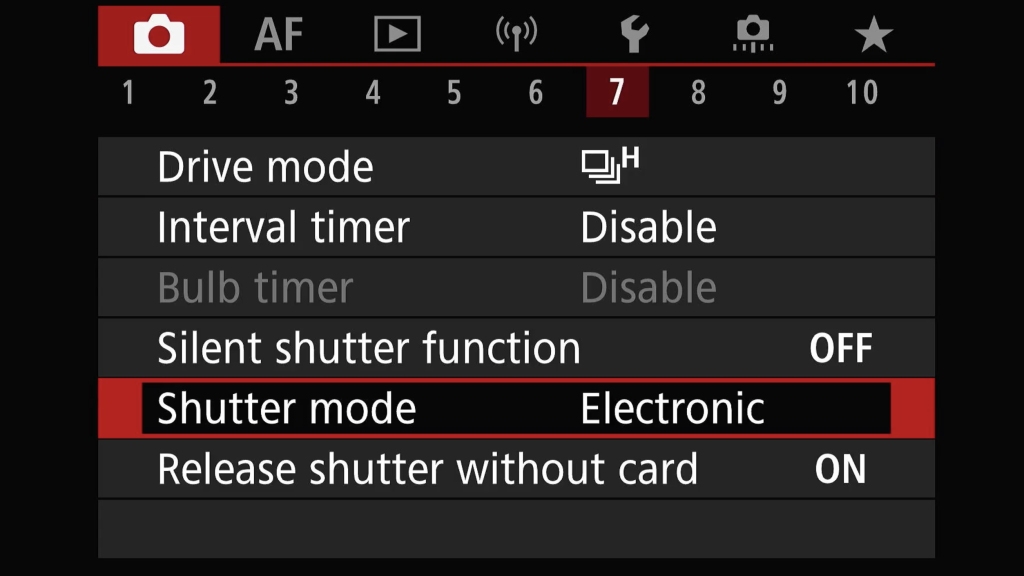
Red 7 gets a little less dull than the previous pages as here I set my shutter mode and speed. With up to 30fps the R7 is fast, but I very rarely shoot at that rate. 15fps is my preferred speed and even that is too much at times. The shutter mode is something that does take a little more thought. There are three options presented to us on the R7, something I hope will reduce to just one in the future. Mechanical shutter is quite loud, which can disturb wildlife and at low shutter speeds cause shutter shock. On a mirrorless camera it has to work harder than on a DSLR too, as it has to close before it starts the exposure cycle and then open up afterwards. This leaves more blackout in the viewfinder but does negate the rolling shutter issues the R& has in electronic shutter mode. I think in the future we will see the end of mechanical shutters as they are becoming increasingly redundant with mirrorless cameras. Next we have Electronic First Curtain shutter. This is a hybrid between full electronic shutter and mechanical with only the second curtain being mechanical. Blackout is reduced as is rolling shutter. It is not as noisy as full mechanical shutter as it doesn't have to work the shutter so hard, but like mechanical shutter you are limited to 15fps maximum. Full Electronic shutter allows 30fps and can be silent. It also provides the best view in the viewfinder as there is no blackout or stoccato effect. This is great for fast moving subjects that are hard to track. However, you cannot use flash with electronic shutter. Its biggest drawback on the R7 is an effect called rolling shutter. This can lead to distorted images with all sorts of odd optical effects. This is caused by the slow readout speed of the 32mp sensor used in the R7. As the sensor is read horizontal line by line, by the time it gets to the bottom the subject may have moved slightly and that is shown in the image. This whole subject is worth of an article or video of its own. Fortunately there are plenty available online that explain it far more concisely than I ever could. Hopefully the technology from cameras like the Canon R3 will trickle down the range so in future we can have cameras with only a full electronic shutter that has none of the aforementioned drawbacks.
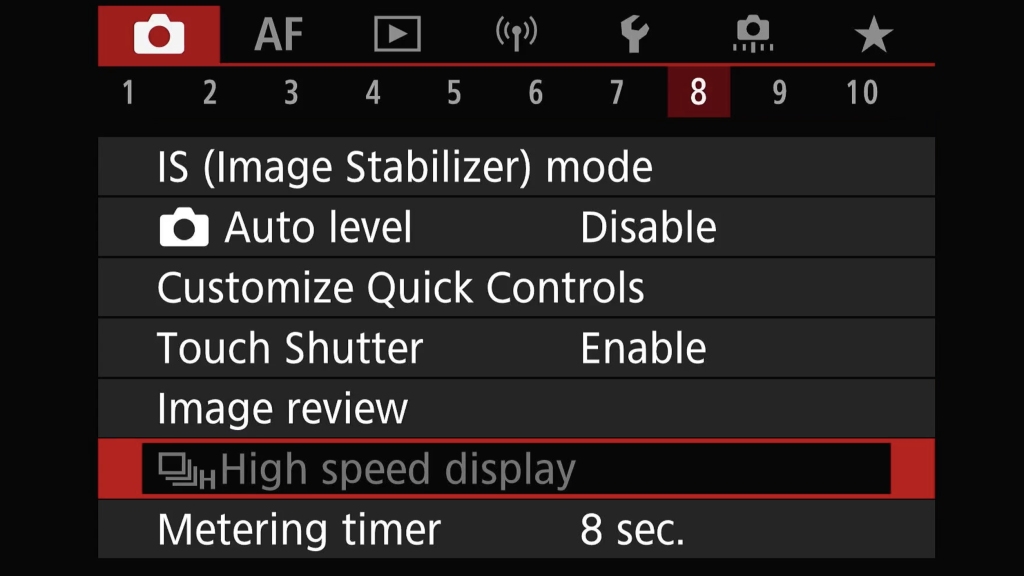
Red 8 has some interesting options that I have yet to explore. IS mode does nothing for me here as I am not discussing video in this article. If I was using an RF lens instead of an adapted EF100-400II for most of my wildlife there would be an option to enable/disable IS, but the EF lens has a switch so it doesn't even display in the menu. Auto level is not useful for fast action shooting. Customize Quick Controls changes what is displayed when you press the Q button, which is where I change many of my settings when out shooting. I have yet to touch this much but that is something I must do as there are features I don't use, and features I would like to add to that screen for rapid adjustment. I do leave image review set to disable as it saves battery. High speed displayThere is an option to only display the review on the rear screen, and not in the viewfinder. I could never see an occasion where I would want to see the last shot automatically displayed in the viewfinder, that would just be intrusive. The final setting in there, metering timer, I have set to 8 seconds. That feels like a reasonable time to me to leave the metering active after I take my finger off the shutter button, any longer adds to batter drain.
Red 9 has a few things going on. First is Display simulation. I have this set to Exposure Simulation. This is a sort of what you see is what you get mode. You see how the exposure should turn out through the viewfinder and can instantly see if things are too dark or too bright. It is one of the biggest strengths of electronic viewfinders. If you adjust any exposure related setting such as compensation or metering mode, you can instantly see the effect it will have. To me it is a no brainer to take advantage of this. There is also an option to have an optical viewfinder simulation, which increases the contrast to make the viewfinder look more like the traditional one in a DSLR, but you loose the ability to see your exposure as it will come out in the shot..
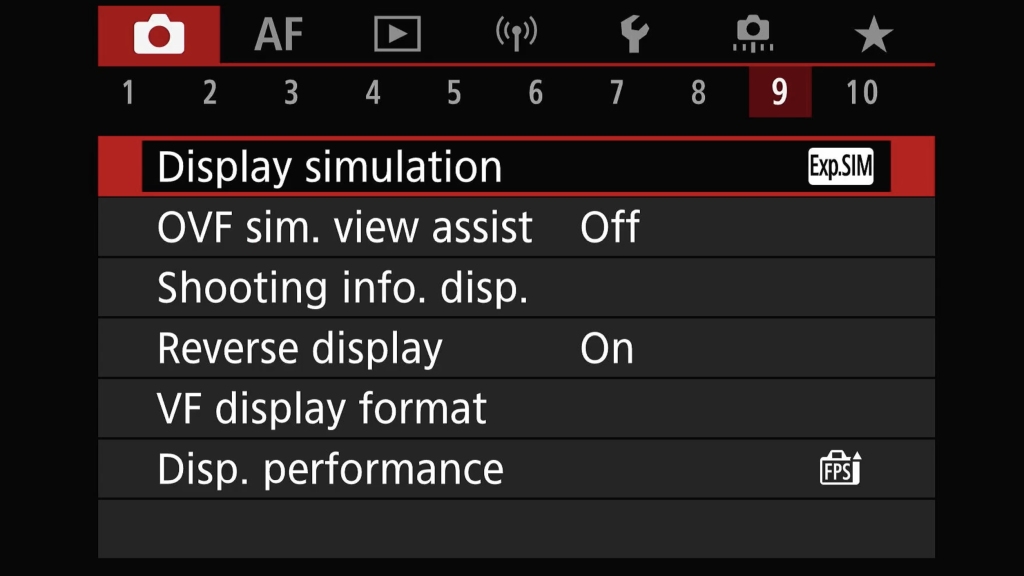
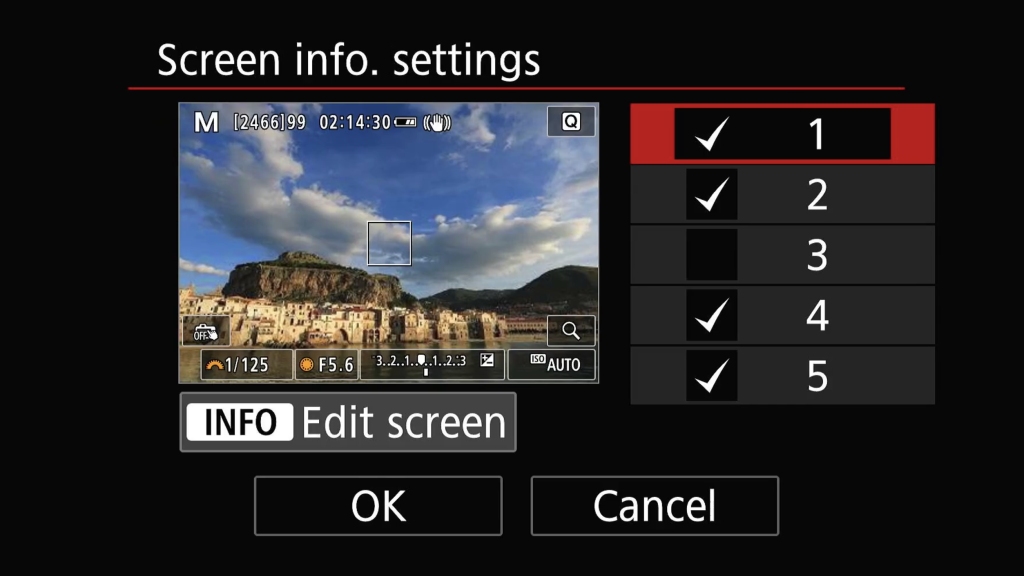
Shooting info. disp. allows you to customise what you see in the EVF. Things like the histogram, grids, lens info, level and more can be displayed. I find too much overwhelming so have quite a minimal information set displayed. I do have lens info displayed as I can see when I have knocked my zoom lens away from where I wanted it. Reverse display is set to On as this flips the display to be correct when you have the flippy screen facing forward. VF display format just seems to shrink the display, so that gets left as is. To me this is a pointless setting
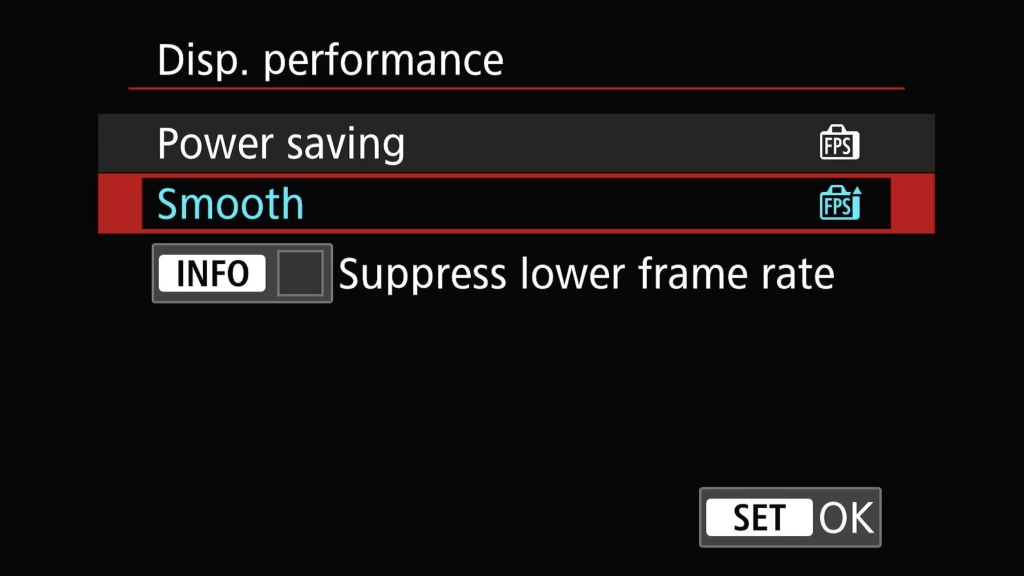
Finally in Red 9 is Disp. performance. I set this to smooth as at the expense of battery life, it doubles the EVF refresh rate from 60hz to 120hz. The battery life on the R7 is very good so I can live with this minor drawback for a fast, smoother, viewfinder experience when shooting fast subjects.
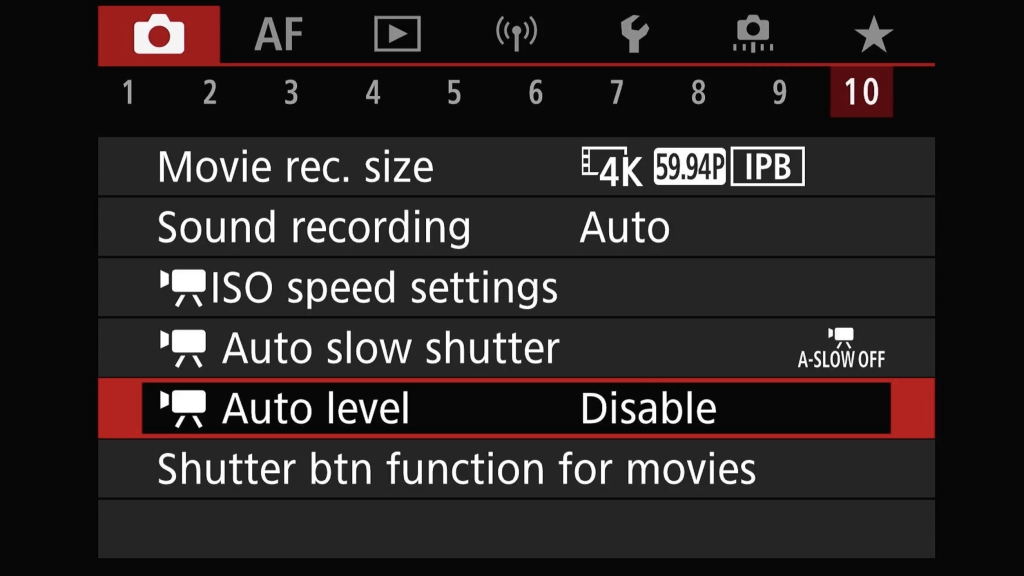
Red 10, the final menu in this section, is all to do with video recording so not something I am looking at in this article.
The pink menus are where many, but not all, of the AF settings are set depending on how the camera is configured. Some settings I configure here, like AF cases and tracking, but activate in custom controls.
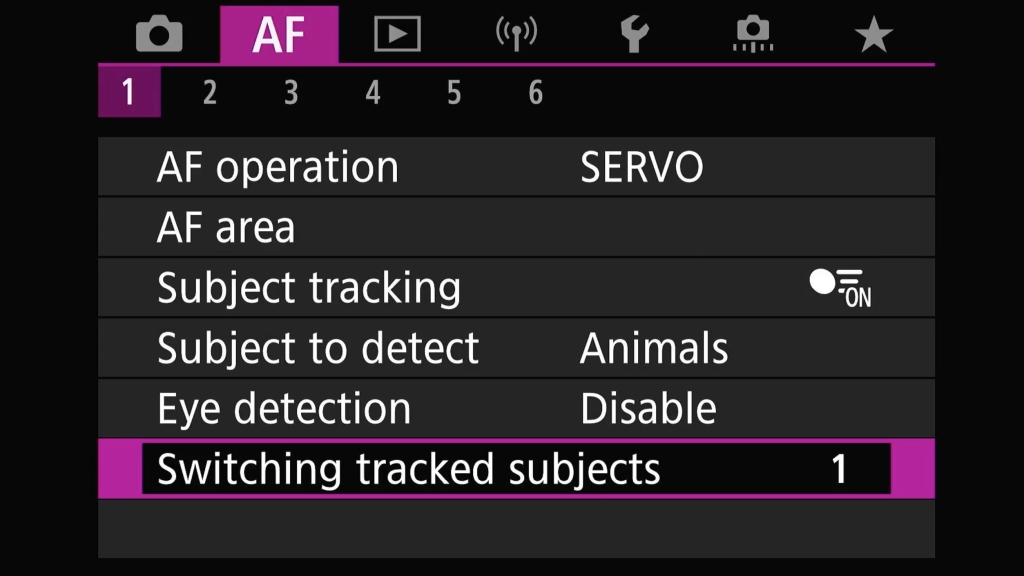
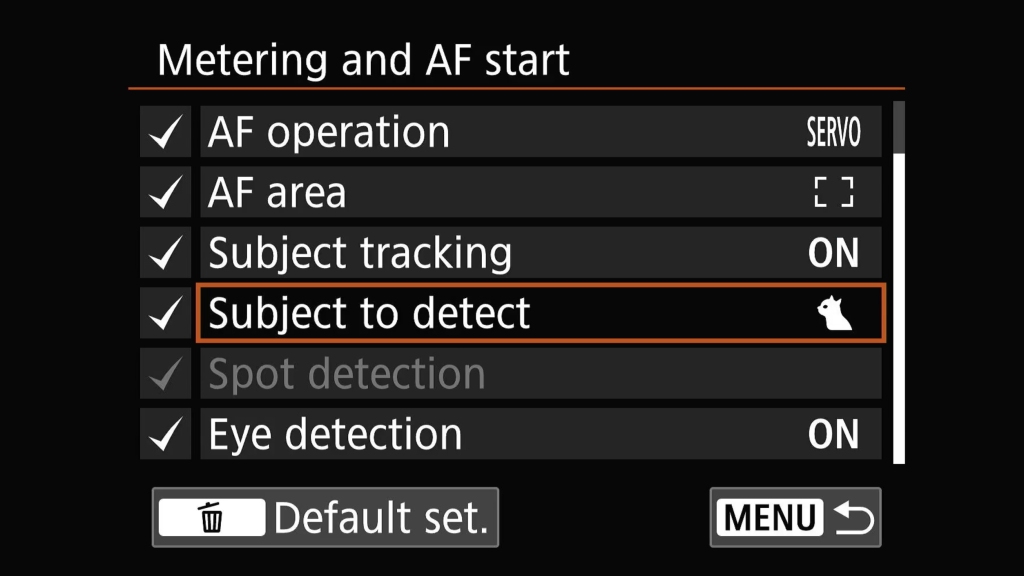
Pink 1 has a number of options I change. AF operation, servo of course as I am shooting moving subjects. This leaves AF running whenever the AF is activated. Everything I shoot in wildlife is moving. Even if the subject isn't, I shoot handheld 99.9999% of the time so I am moving in relation to the subject. There is also a one shot mode here, but in my mind this is only really relevant for shooting rocks while the camera is on a tripod. I am sure landscape shooters love it, but even then I use back button focus so essentially I am in one shot mode just by releasing the back button. The next setting dictates the initial number of AF points whether the camera is being use in landscape or portrait mode. This I just have set to full for everything. Subject tracking? On, of course I want my subject tracked, why wouldn't I? Subject to detect, I'm shooting wildlife as people are horrible creatures. As such this is set to animals as that is what I want to track. Eye detection I leave switched off here and switch it on through custom controls for my back button focus configuration. Finally we have Switching tracked subjects which I leave set to 1. This tracks the subject initially determined for AF, to the extent possible. It then switches to other subjects if the camera can no longer determine if the tracked subject is the main subject.
Pink 2 is for configuration of the AF cases. In normal use I would select the case in use here. When using back button focus you can extend things so by using different back buttons you can use a different case. So I may be using case 2 when focusing with the AF-ON button, but case 1 if I focus with the * button. I mainly use case 2 but with the settings below. This makes the AF point a little more sticky on the subject, which for me seems the best option for tracking most moving wildlife.

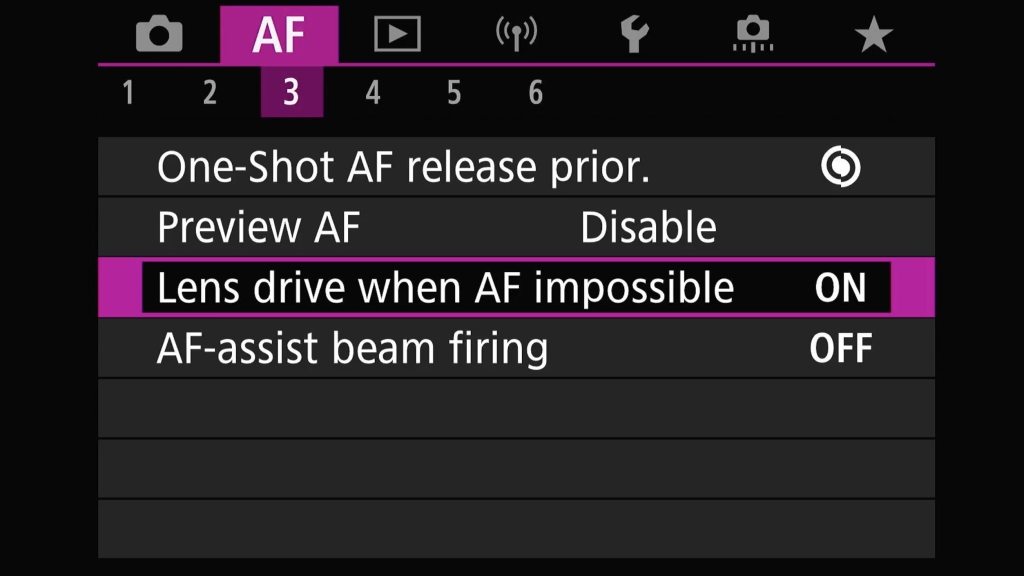
Pink 3 has an annoying setting for wildlife, especially if I want to use back button focus. That is the Preview AF setting. If enabled, AF runs all the time and all you do is switch detected subjects. At first I thought this was going to be useful, but in practice it drains battery and just becomes annoying. It removes any functionality of BBF. As such I leave it to disabled. The other setting I change in this menu is Lens drive when AF impossible. I want this ON. It means if what you are seeing through the viewfinder is all blurry, the lens will drive until it finds focus on something. I've found that compared to a DSLR, this setting really is needed to help get on subjects quickly. Even then, if the focus is a very long way off a little twist of the focus dial is occasionally needed to get the camera heading in the right direction. This seems to be a trait of all mirrorless cameras I have tried.
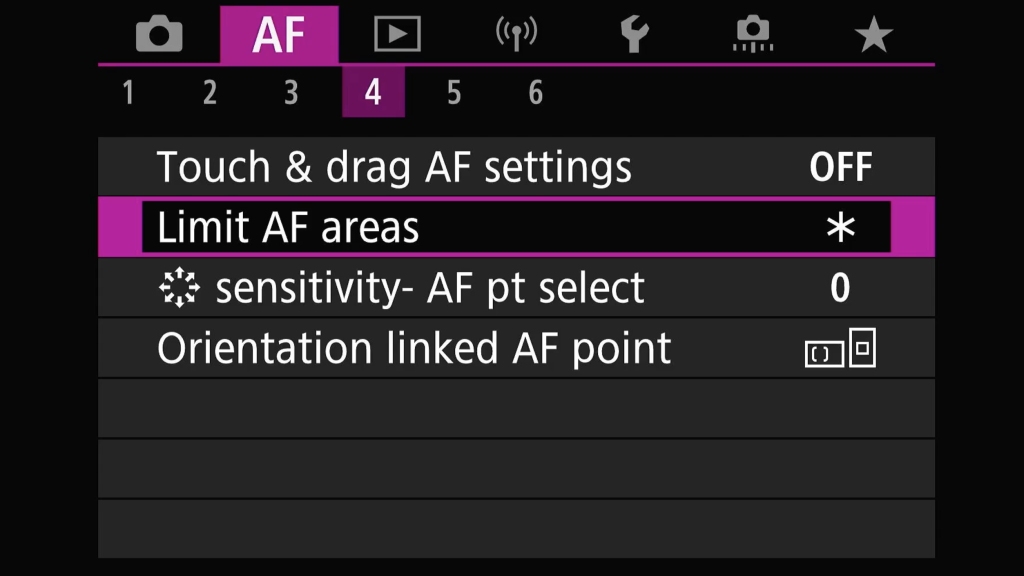
Pink 4 has only one setting I am currently using and that is Limit AF areas.
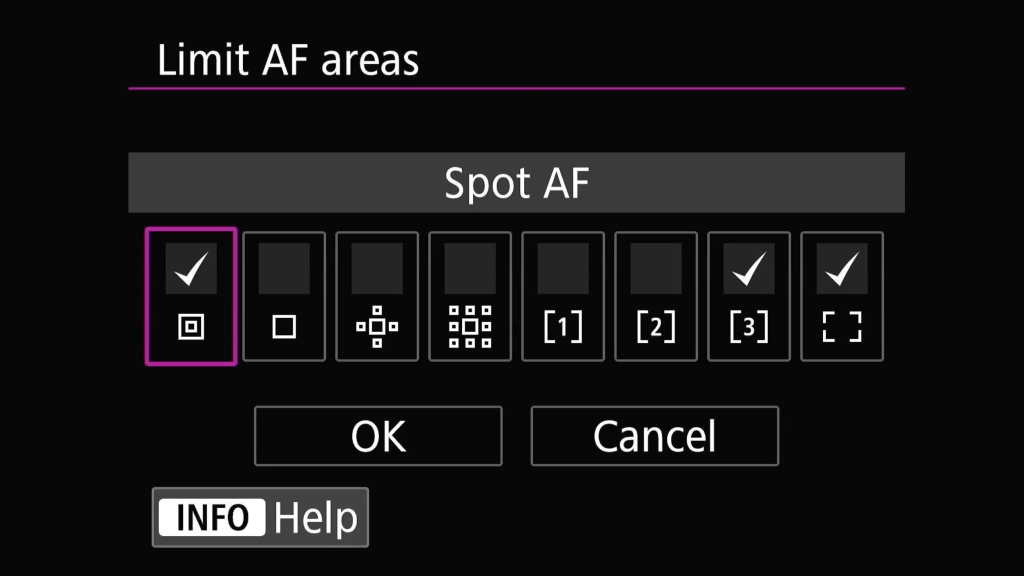
On my old DSLRs I would most often be using the center point plus 8 helpers as my go to setup. When I first switched to the R7 I stuck with my old tried and tested settings. I quickly learned that the AF on this camera is so good that I can almost all the time just use all the AF points and let the cameras animal detection do the heavy lifting. The only exceptions are when shooting flocks of birds, or a single bird when hidden in foliage. Even with the latter, the AF seems to do an amazing job of just working. I still have one of the flexible zones enables so I can if needed use it. I only have setup back buttons for full and spot but I can select the other zone easily using the default setting of the mfn button.
Pink 5 is a menu I have not setup here. There are some interesting focus aids for manual focus which are great for macro work, but I enable them on a custom button if needed.

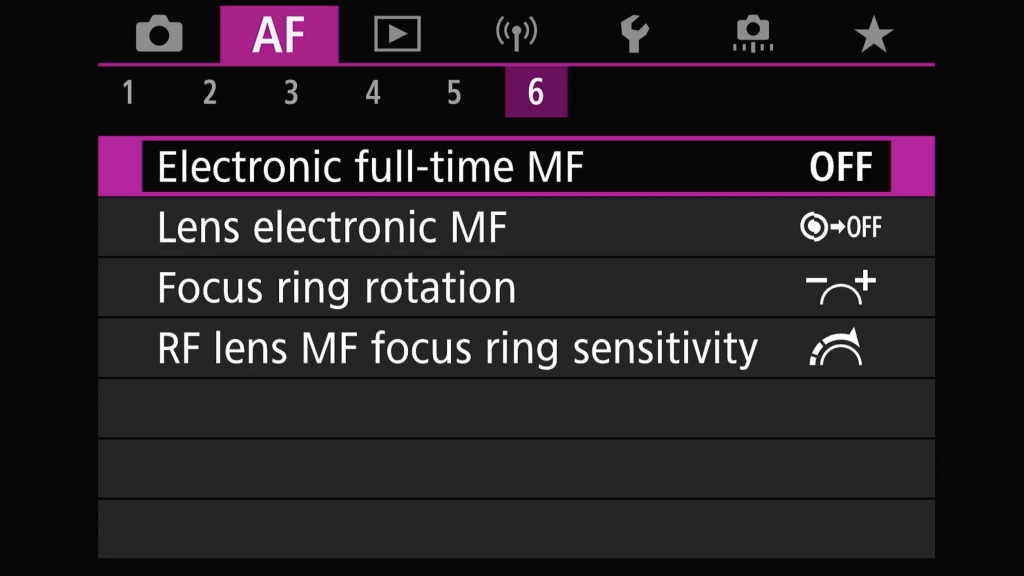
Pink 6 is another page I have not touched. Nothing in there interests me for my current usage.
The blue menus are all to do with image reviewing and in camera faffing about with editing the only menu I do any configuration on here is blue 5.
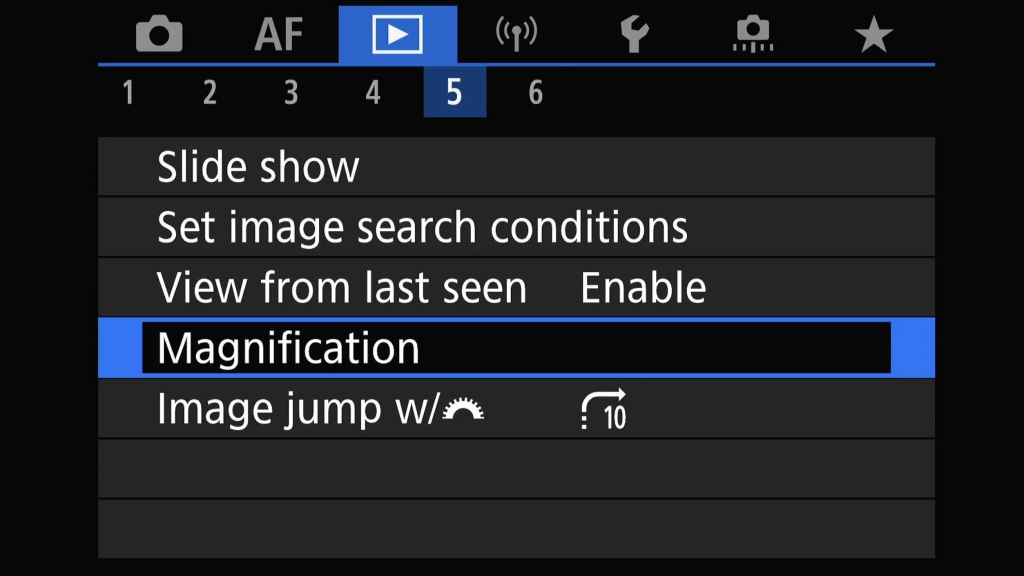
This for when chimping. A click of the magnifier button and the camera should zoom in to a high level on the AF point the camera selected when the image was taken. I am convinced this doesn't work as it should though. Often the review will zoom into a point, but a different point that DPP, canons post processing app on the computer sees as the focus point. Still useful, when it works.

The Purple menu only has one page and it is all to do with Wi-Fi and Bluetooth. I do use this for remote shooting, the only time I really use a tripod. In the past I have setup my camera pointing as a vole hole, badger set and bird perches etc while I sit at a distance watching what the camera sees on my phone or iPad. This can yield some great opportunities but it it is a big battery hog. I found that it is best to add an external power bank via the USB - C port on the camera if doing this for any length of time.
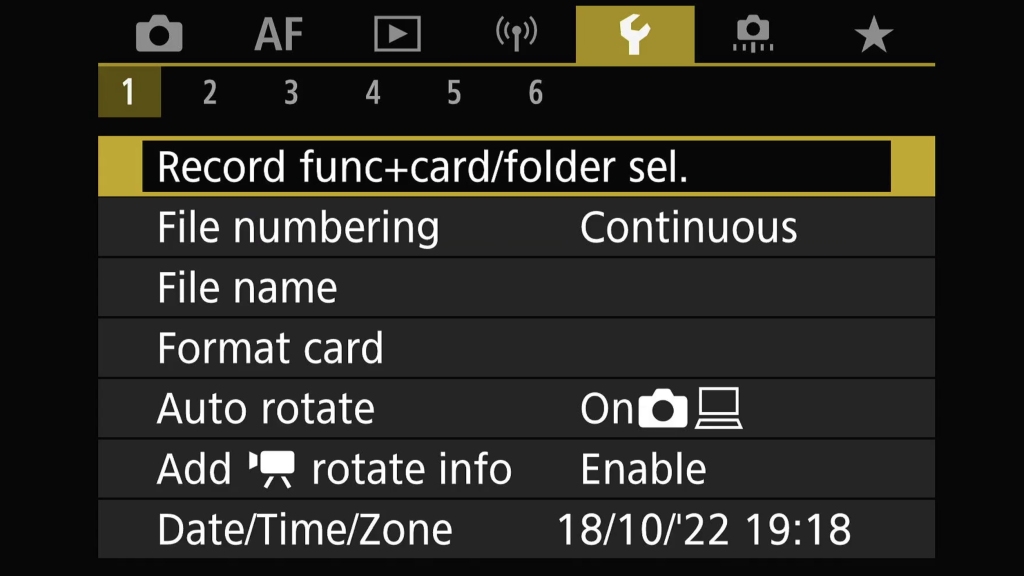
The yellow menus have some fun bits where I have done a bit of fettling to get the camera to behave in the way I want it to.
Yellow 1 is all quite self explanatory. I set how and where files are saved over my two memory cards, enable auto rotate so images are shown the right way up and set the time and date.
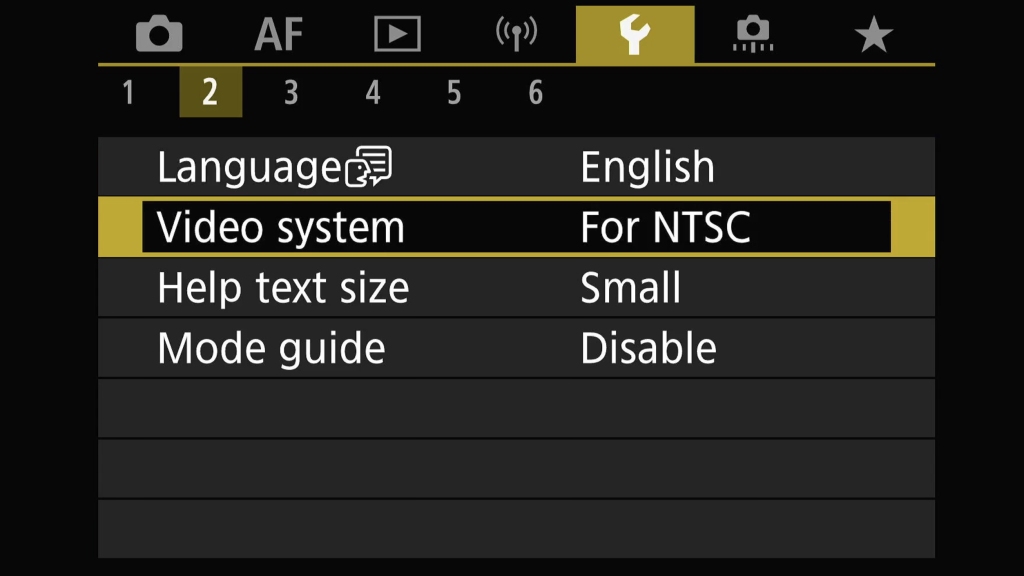
Yellow 2 I only change one setting and tat is the video system to NTSC. That may sound odd given I am in a PAL region here in the UK. However, are NTSC and PAL really relevant these days? Not really IMO, we just talks about framerates, 1080p and 4k etc. Here I set NTSC so I gain access to 120fps slow motion in video modes, instead of 100fps that is the fastest you can go in PAL mode. On the rare occasions I shoot video I can set my rates for output later on in whatever editing package I use.
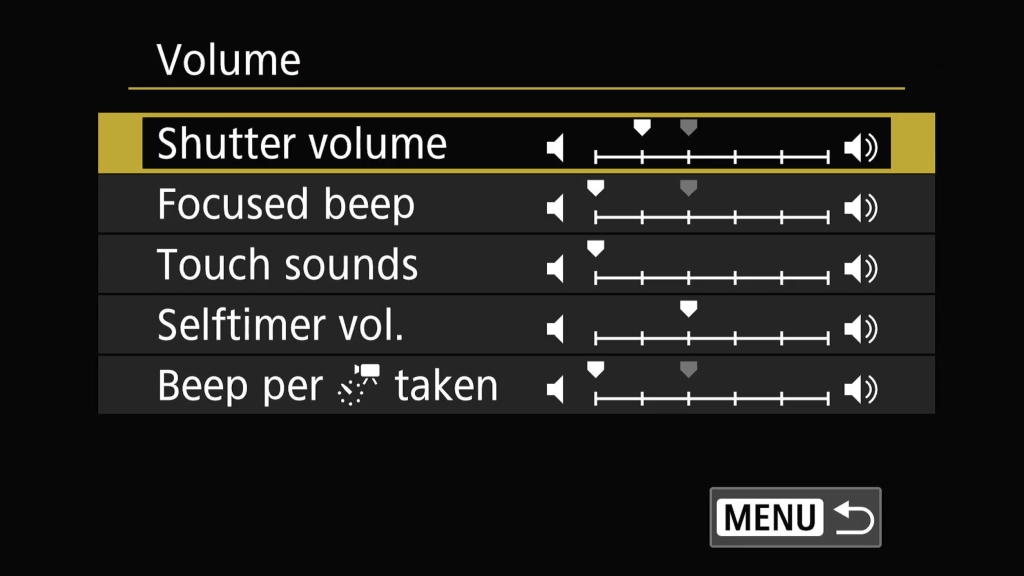
Yellow 3 has a great setting that is not present on the R5 and R6, volume.
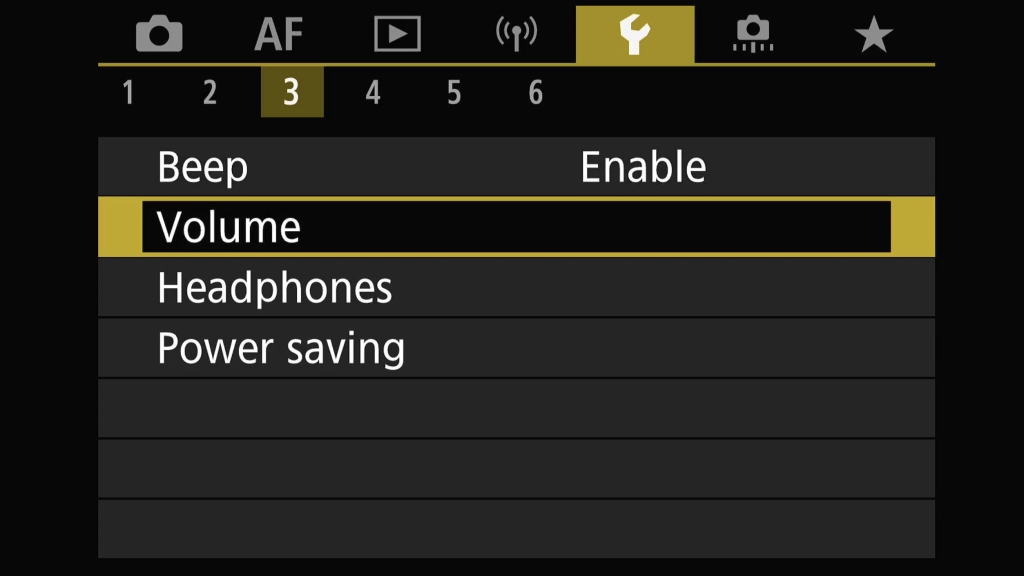
In electronic shutter I don't want total silence. I want some feedback so I actually notice when I am leaning on the shutter button when I put my camera down or am carrying it. I don't want to find out that for the last 10 minutes the shutter button has been pressed, my card is full and my battery is flat just as an Osprey flies over my noggin. Ask me how I know lol. So I enable a fake shutter sound for use in electronic shutter. Other sounds are on silent to prevent me annoying the smeg out of any birders who may be in the same hide.
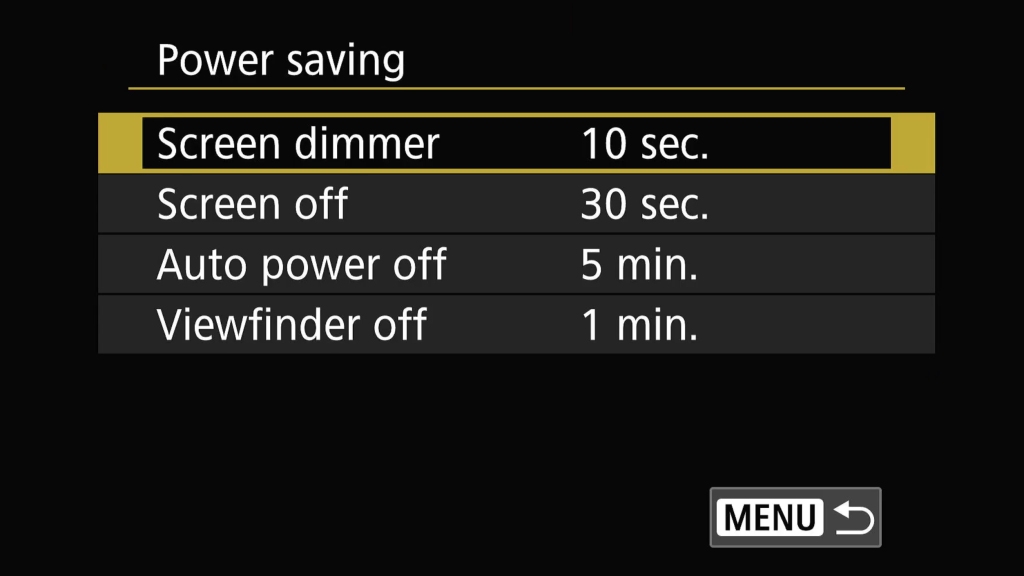
I also setup my power saver settings here to maximize battery life but not have things shut off too quickly. In particular the screen off setting at 30 seconds. This also deactivates the image stabilizer in the lens and camera after 30 seconds saving more power.
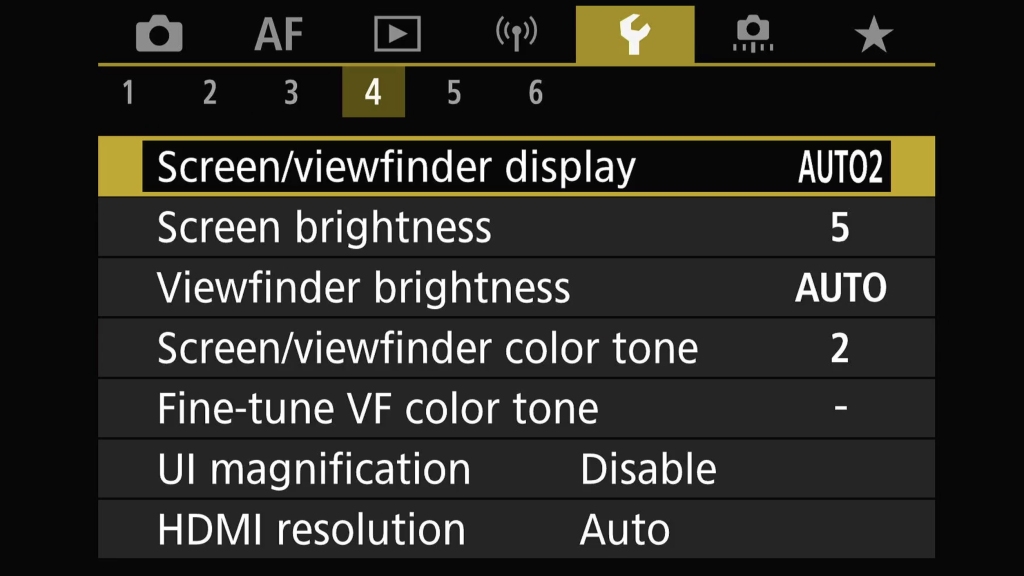
Yellow 4 is also quite self explanatory. My preference is for the display to auto switch between screen and viewfinder. I have the screen set to 5 as this feels right, and viewfinder brightness set to Auto for the same reason. Screen/Viewfinder tone is set to 2, which is the standard setting and again, just looks right to me.
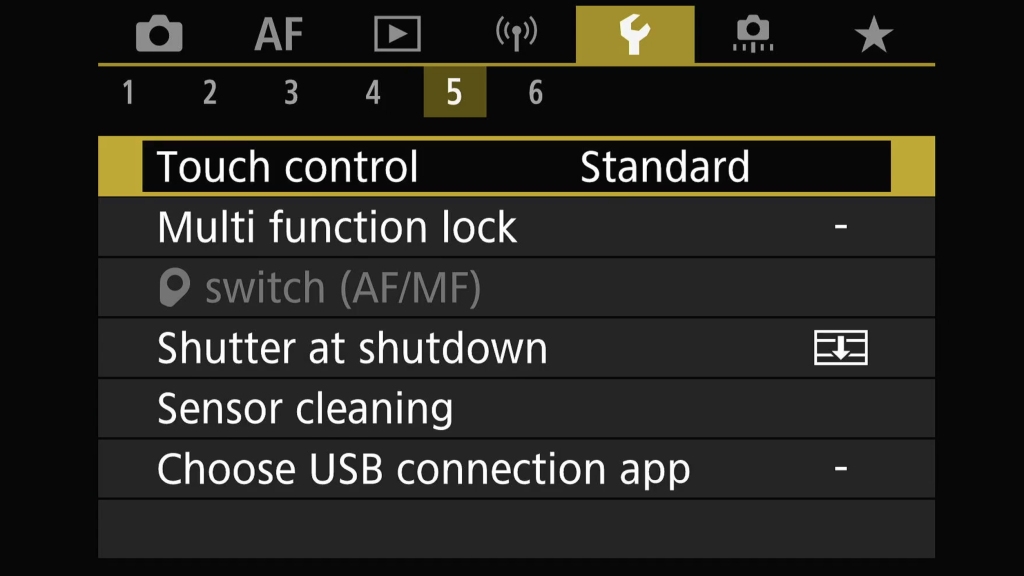
Yellow 5 I have left everything at the defaults. That incudes closing the shutter at shutdown to help prevent dust getting on the sensor when I change lenses. I did leave it set to open once just to see the sensor. It is amazing just how much it shakes during the power on cleaning cycle, especially compared to the very minor shake seen on DSLRs.
Yellow 6 is all quite self explanatory.
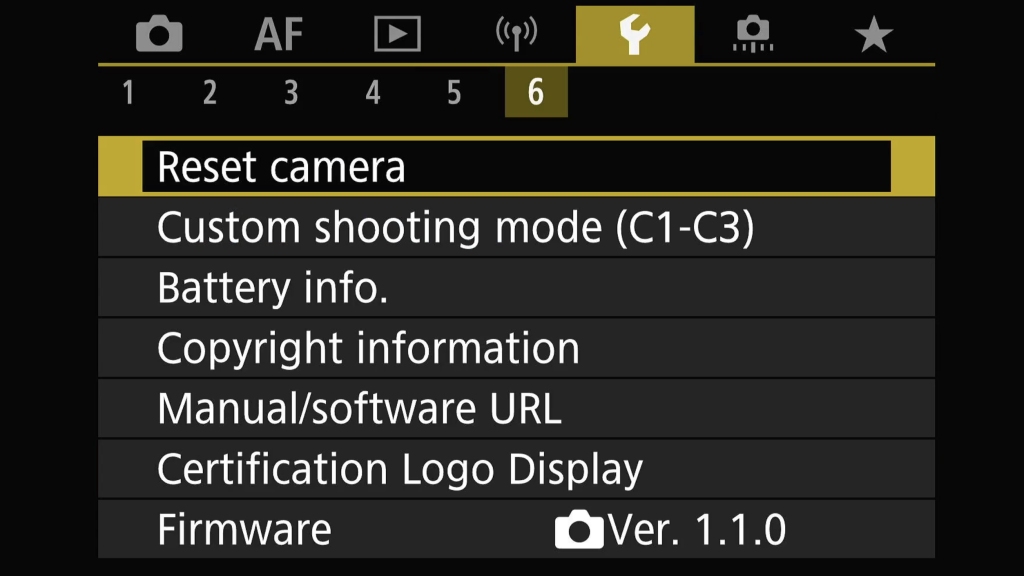
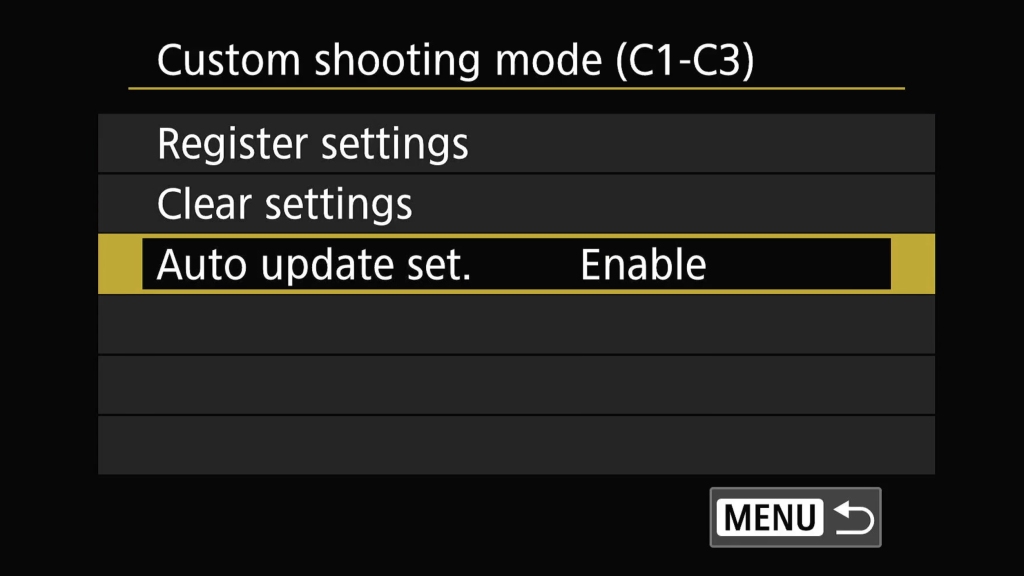
I have changed the behavior in the Custom shooting (C1-C3) menu. After registering my basic settings to C3 I also enable Auto updates set. I do this as if I change shutter speed, aperture etc while shooting, I do not want those settings to revert to default when the camera goes to sleep. I do have to be careful on my next outing though as I may have set something not appropriate for the current session. I've lost count of the number of times my shutter speed is far too high, or far too low and not noticed. The EVF and exposure simulation has reduced the chances of me doing that.
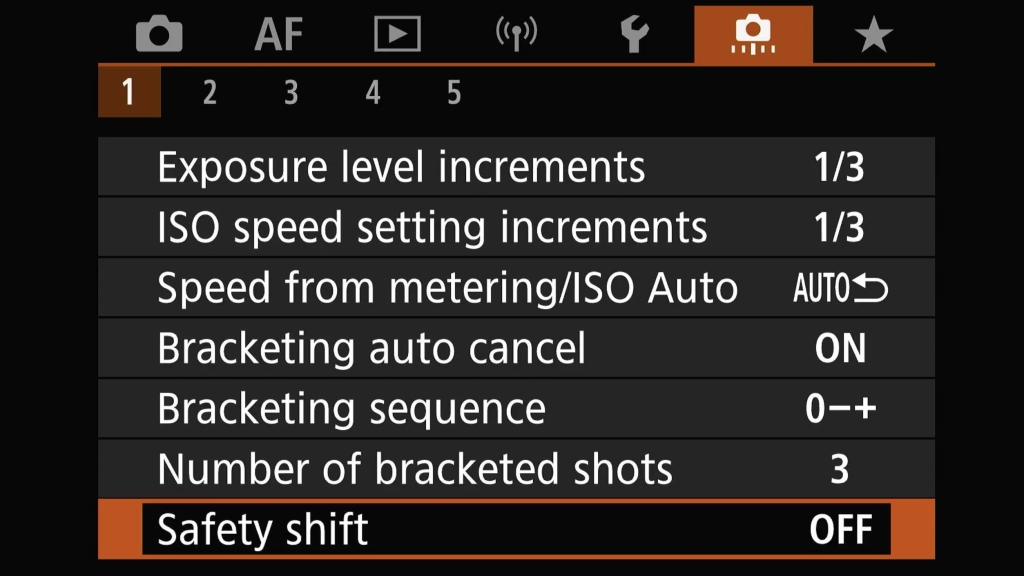
The orange menus are all about the custom settings, changing controls and much more. It is the area that allows me to get the cameras ergonomics how I want, allowing me to make rapid changed depending on the situation. Having said that I don't remember changing anything in Orange 1
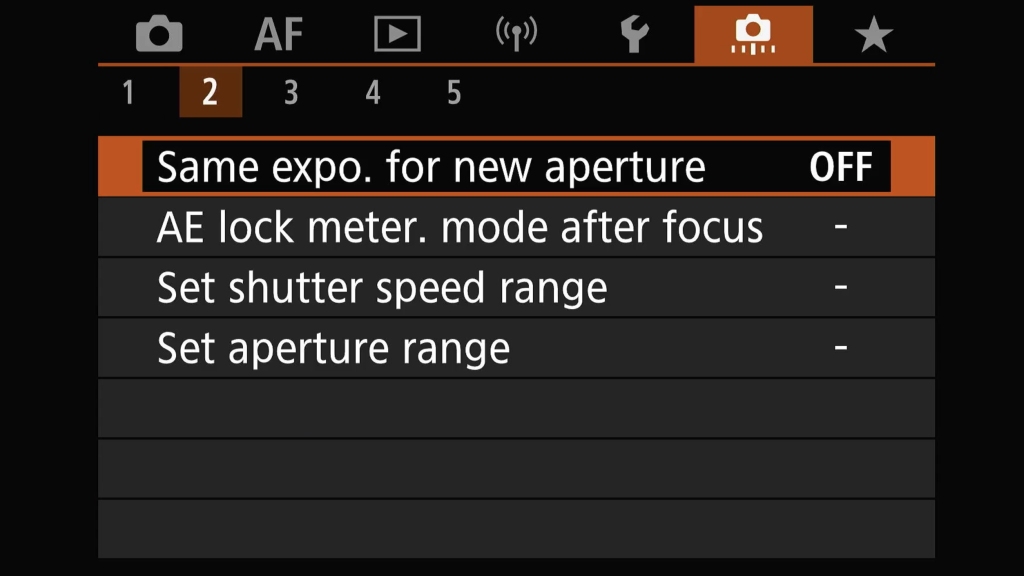
Nor have I changed anything in Orange 2.
Orange 3 however is where I had a lot fettling and head scratching. That was just one item here, customizing the buttons to my needs. I want to explore this more as I learn the camera and will probably be fiddling until the next camera comes along.
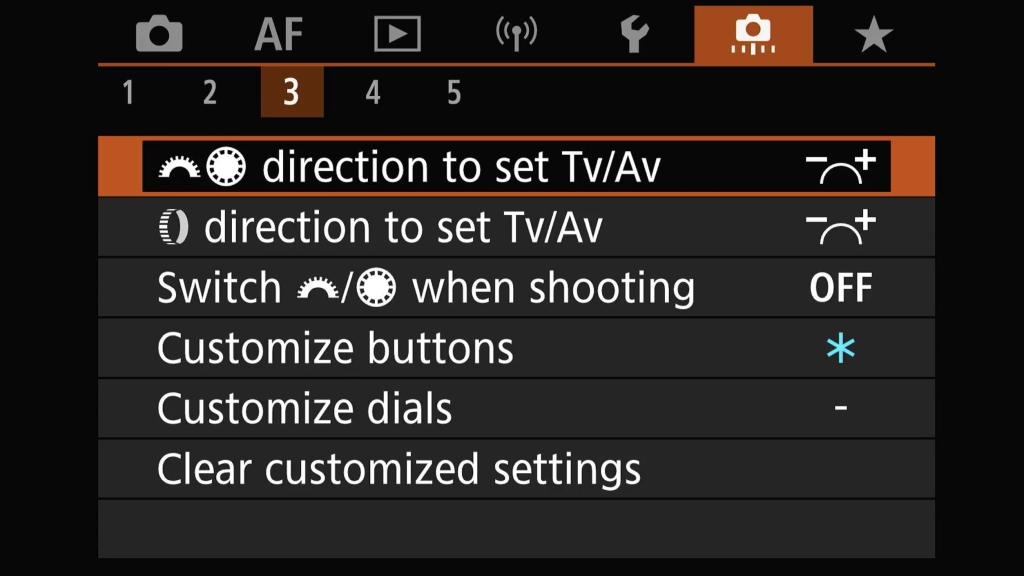
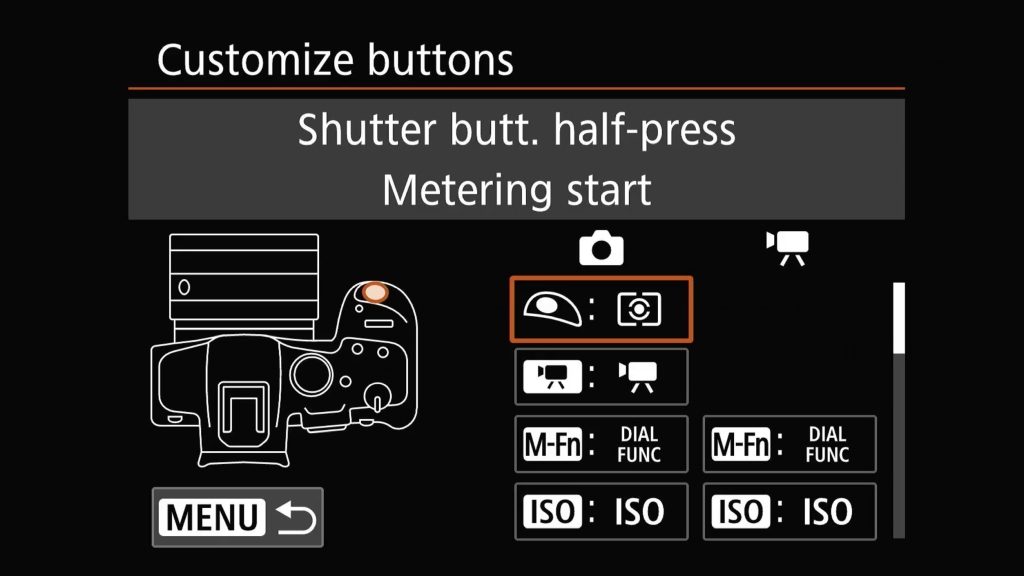
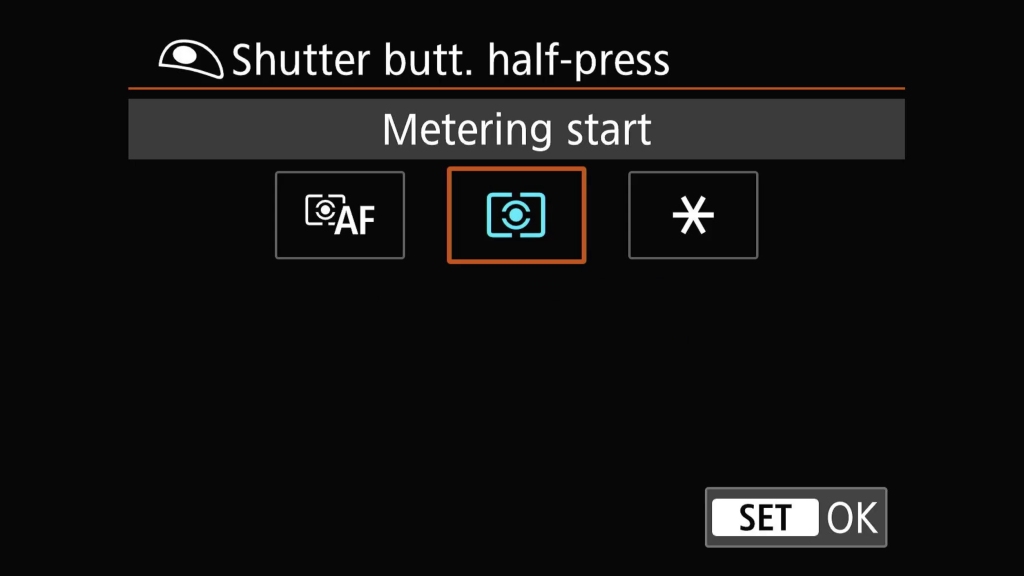
First thing I do here is set the shutter button to metering and shutter release only, removing AF from that button so I can have my desired setting on various back buttons.
The next button I configure is AF-ON
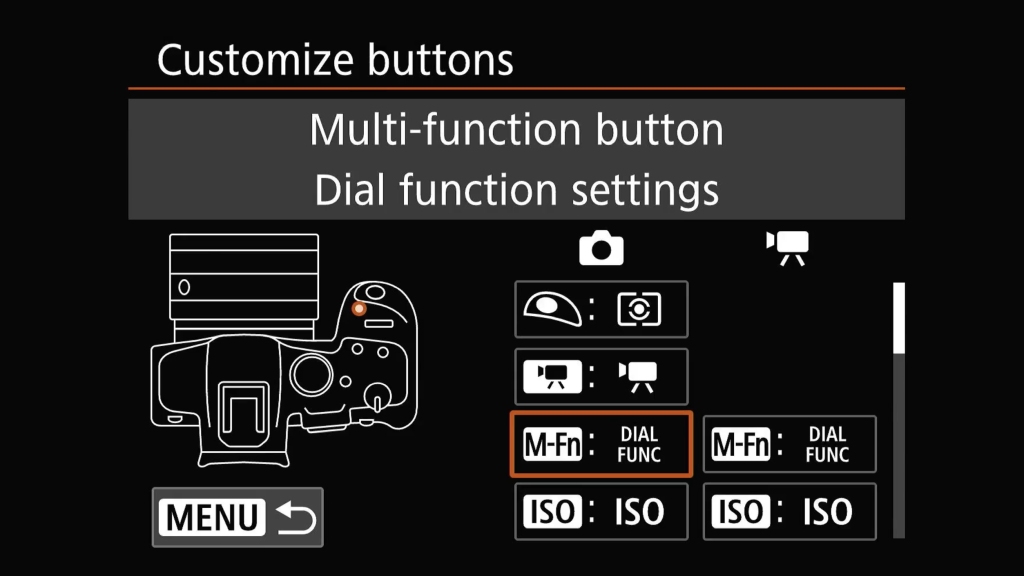
Here I set the Dial Function.
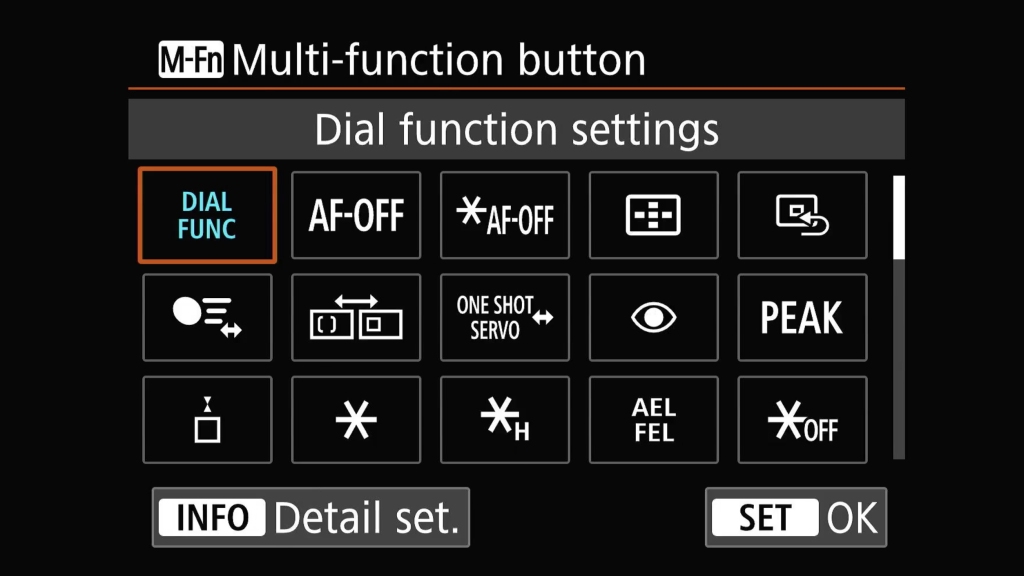
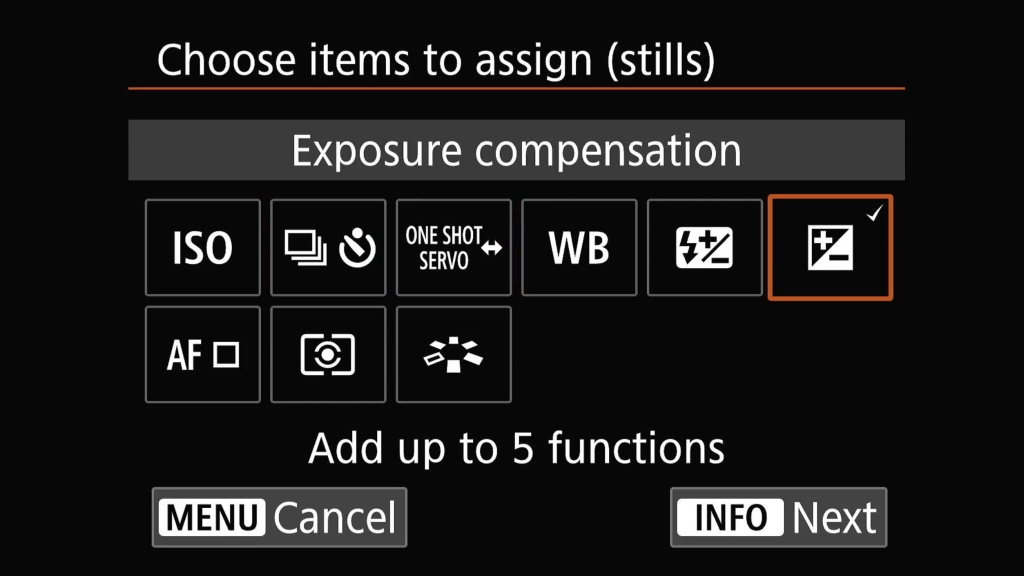
While the menu is open I press the info button. This opens a sub menu where I decide what features can be selected on the top dial after M-Fn is pressed. I only want one function here, the ability to change exposure compensation. As M-Fn is nicely placed next to the shutter, I can quickly adjust compensation as needed. Press M-Fn>twiddle the top dial and shoot away. So I only hav the one item ticked. If others are selected too, you can scroll between them with the joystick or rear pad.
The next button I customize is AF-ON
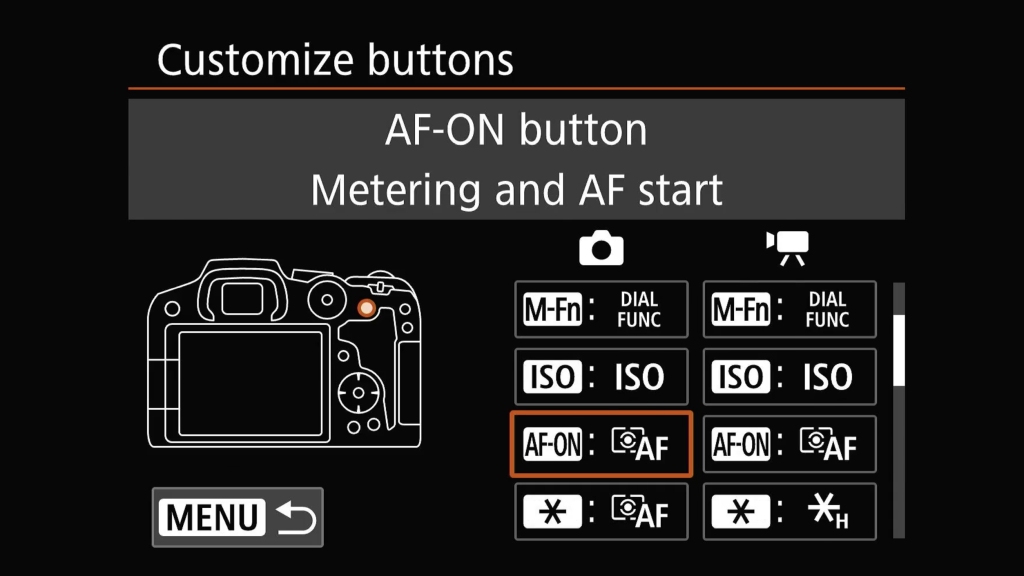
Here, with Metering and AF Start highlighted I press the Info button to bring up the details
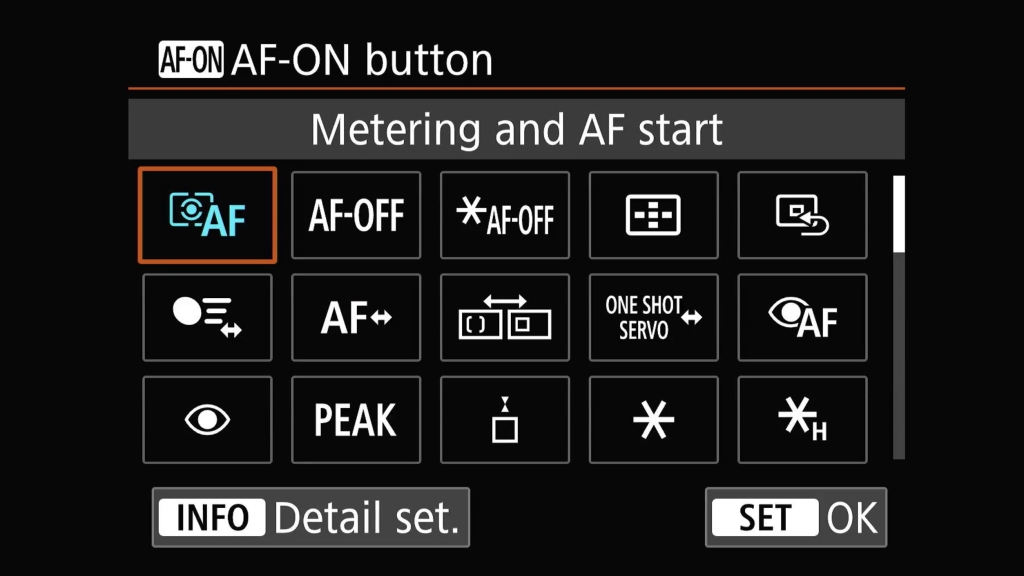
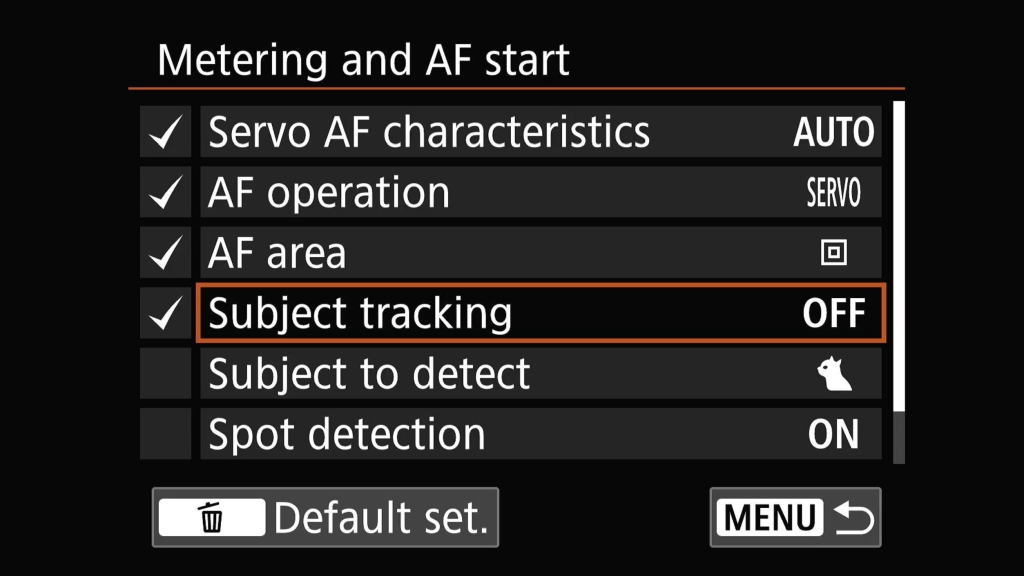
The detail page confused me at first look as I didn't see the tick boxes on the left. The items on the right are the settings where the case can be selected, AF mode, AF start area, subject tracking and eye detection. These items are only effective if the tick box on the left is ticked. For this button, everything is ticked. Servo AF characteristics are set to case 2, which I customized earlier in pink menu 2. I have Servo mode enabled, full AF area subject tracking on and set to animal and eye detect on. It has proven quite effective much of the time for me.
Next I customize the * button
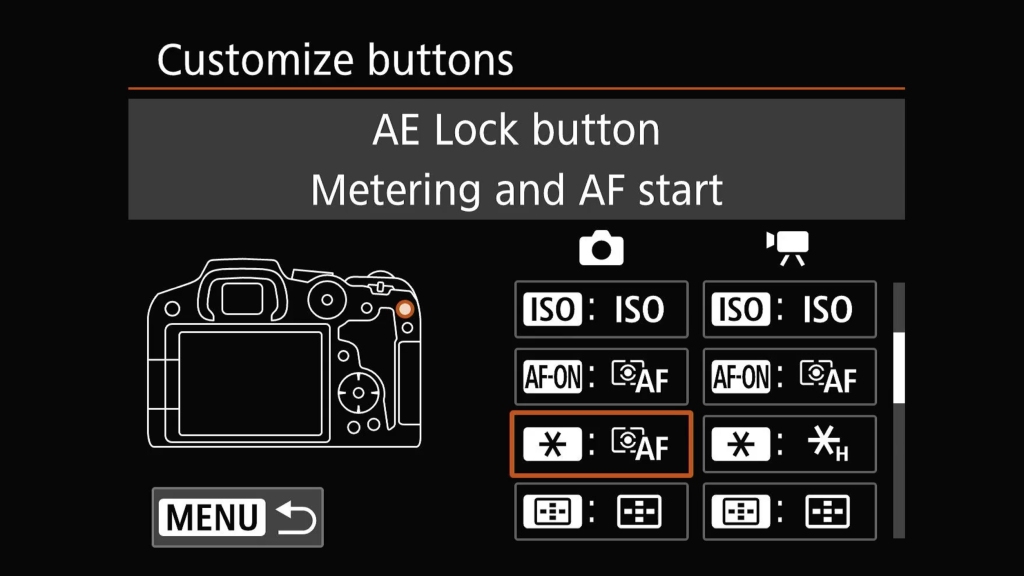
Again with Metering and AF start I press the info button to set the detail. Here Servo AF Characteristics are set to Auto with the box ticked on the left. AF operation is ticked and set to servo. I have the AF area set to Spot and subject tracking Off. This just gives traditional spot AF when I use this button. It is useful for crowded scenes with lots of subjects. Now just by moving my thumb I can go from full tracking over the whole AF area to the most basic of spot AF modes.
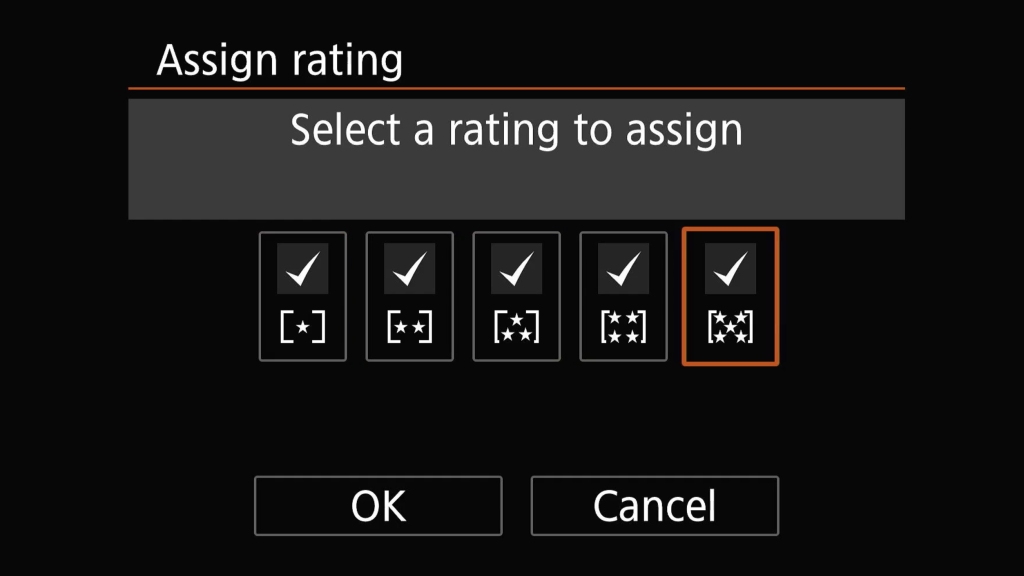
Onto the DOF preview button. In its default function I never use it. So I change it to a dedicated ratings button. Many never use ratings, but I find them useful. If I take a shot that I think is really nice I give it a rating so it is easy to pick out three weeks later when I get around to editing.
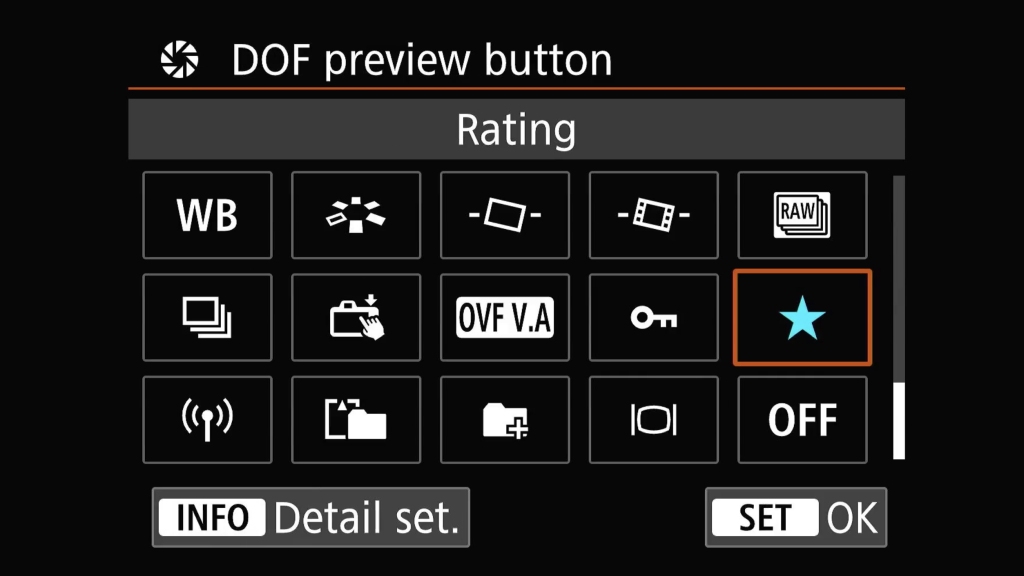
Again, there is a sub menu when the INFO button is pressed with the star highlighted. This allows more control over ratings. I like to be able to give 1-5 stars so all boxes are checked
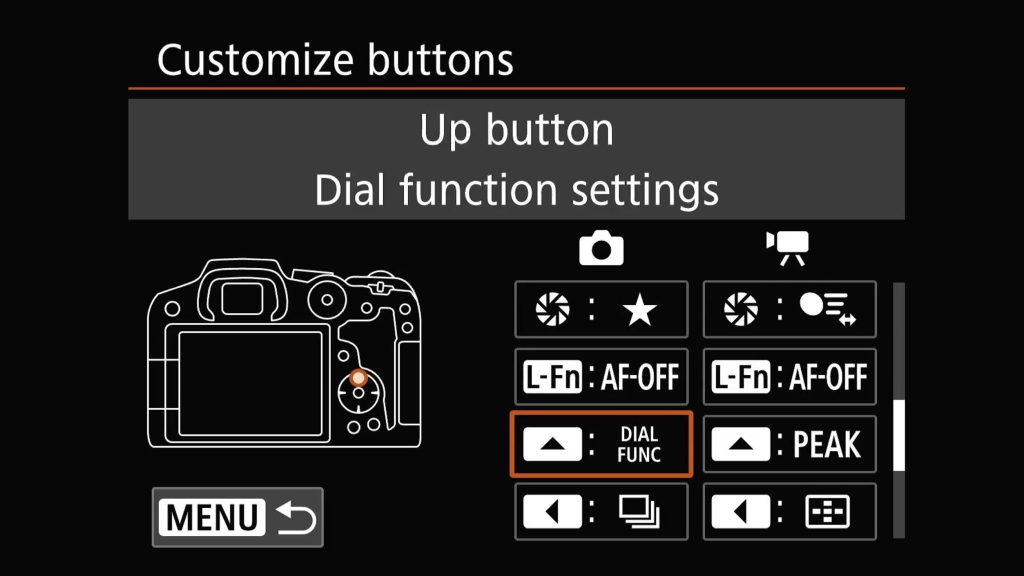
Next I customize the up, down, left and right buttons. Up us set to dial function, again another button I can use to change exposure compensation. Like before it has a detail sub menu accessed with he INFO button. Why do I have two places to change exposure comp? It was setup in the early stages with this camera and I was struggling to find the M-Fn button. I will probably change what the Up button does in future as my muscle memory develops accessing the M-Fn button
Left I have set for quick access to drive modes. I can press this then use the top dial to quickly change frames per second or activate the self timer etc.

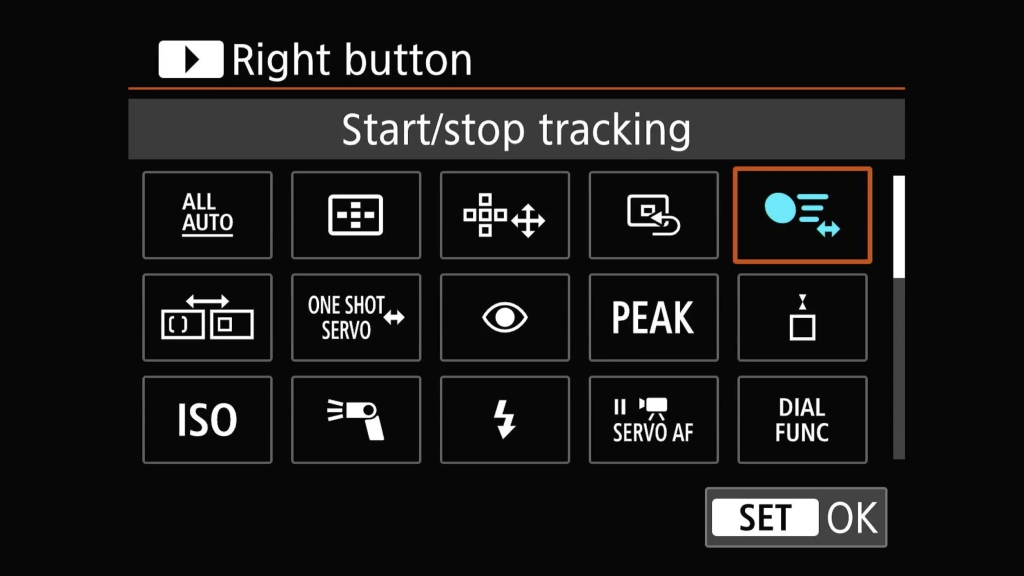
Right I have assigned to start/stop tracking. I can now just click this and an icon pops up in the EVF telling me it is on. Now when I press the * button I get spot AF as the start point, but full animal tracking afterwards. I just press right later on to turn tracking off if I want to return to basic AF on that button.
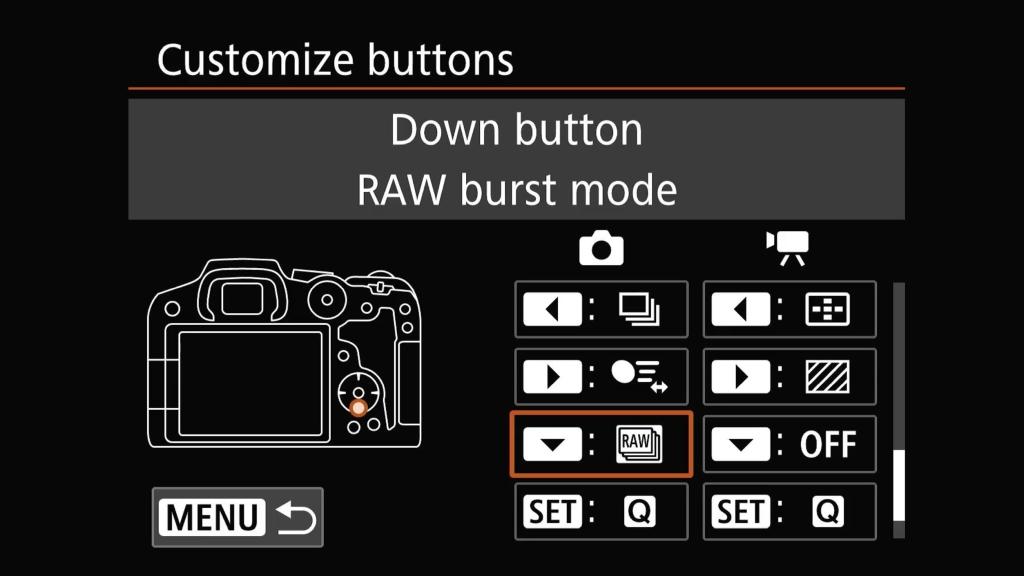
Finally the down button I have set to enable RAW burst mode. I will use this to capture insects or birds taking off. Anything where a creature will reacts much faster than I can.
Orange menu 4 has little interest here. Orange 5 has just one option, to clear all custom settings. I hope I never press that by mistake.
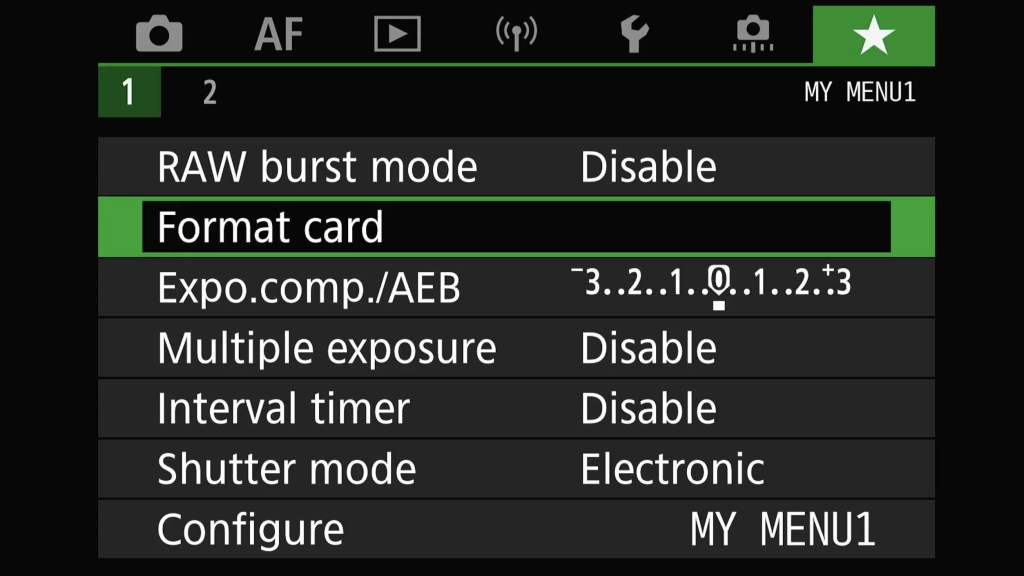
The green menu is a user setup menu. Any feature from the normal menus can be placed here. I have often used features like Forms Card and Exposure comp (again) placed here. I also have multiple exposure and the interval timer programmed for the few times I shoot Astro. Its the only way I can find them as I use these features only on the rare occasion we actually get clear skies at night here in the UK.
If you've made it this far without entering sleepy go by by mode you have done well. I know I dropped off writing all this over three days. Hopefully both my readers will have found something useful in my ramblings. Or maybe you have something to share that I ca try and see if it helps streamline my setup. I am all ears so please use the comments below or feel free to get in touch via the contact form. The R7 has so many possibilities for customization and I am sure as time goes on some of my setup will evolve.